# springboot 介绍
# 介绍
SpringBoot是由Pivotal团队在2013年开始研发、2014年4月发布第一个版本的全新开源的轻量级框架。 它基于Spring4.0设计,不仅继承了Spring框架原有的优秀特性,而且还通过简化配置来进一步简化了Spring应用的整 个搭建和开发过程。另外SpringBoot通过集成大量的框架使得依赖包的版本冲突,以及引用的不稳定性等问题得到了很好的解决。
# 特点
- 独立运行spring项目。Spring Boot以jar包的形式可以独立运行,使用java -jar xx.jar 就可以成功运行项目。
- 内嵌Tomcat或Jetty等Servlet容器,无需部署war包,当然也可以部署。
- 提供自动配置的“starter”项目对象模型(POMS)以简化Maven配置。
- 尽可能自动配置Spring容器。
- 不需要XML配置。
- 其他大量的项目都是基于Spring Boot之上的,如Spring Cloud。
# 环境准备
- Java环境(JDK 1.8或以上版本)
- 开发工具:IntelliJ IDEA
- Maven版本:apache-maven-3.3.9(或者高于这个版本
提示
jdk安装,idea集成maven等基础工作需要大家自行配置
# springboot初体验
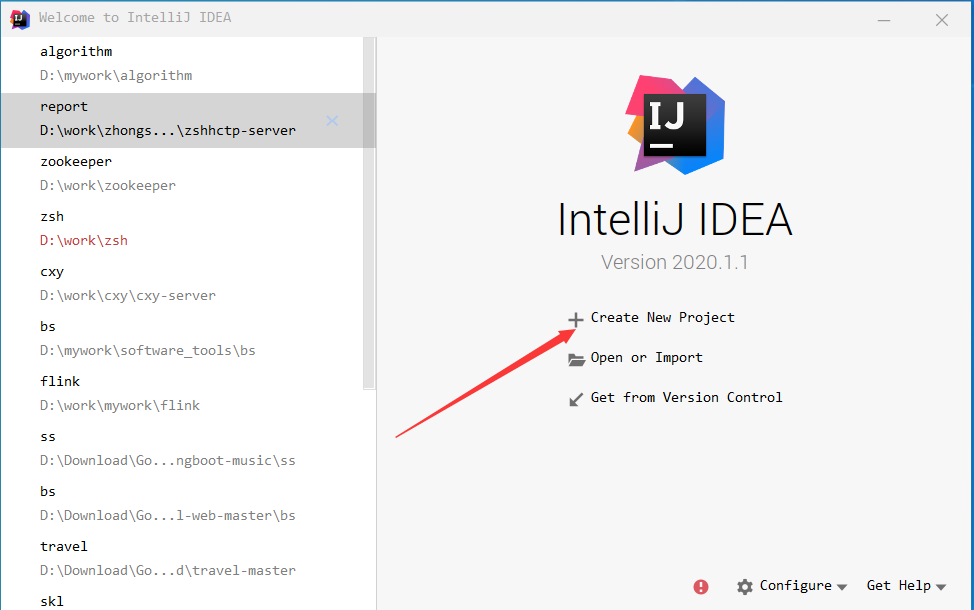
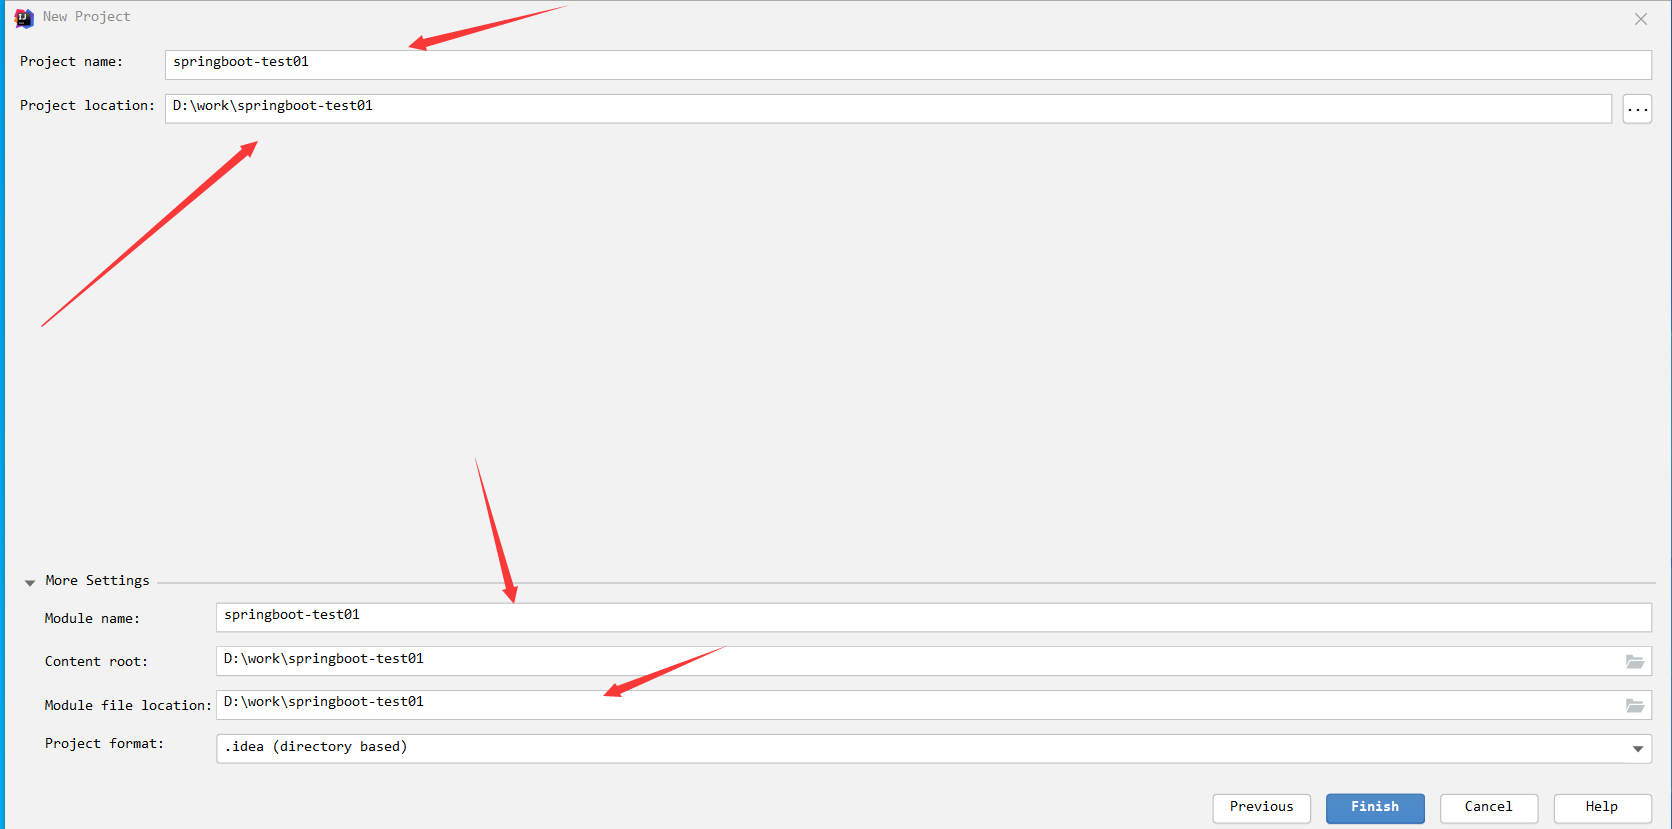
# 创建项目
# 方案一(推荐)
- 建立一个新项目(SpringbootTest01)
- 设置java版本java1.8(常用版本)
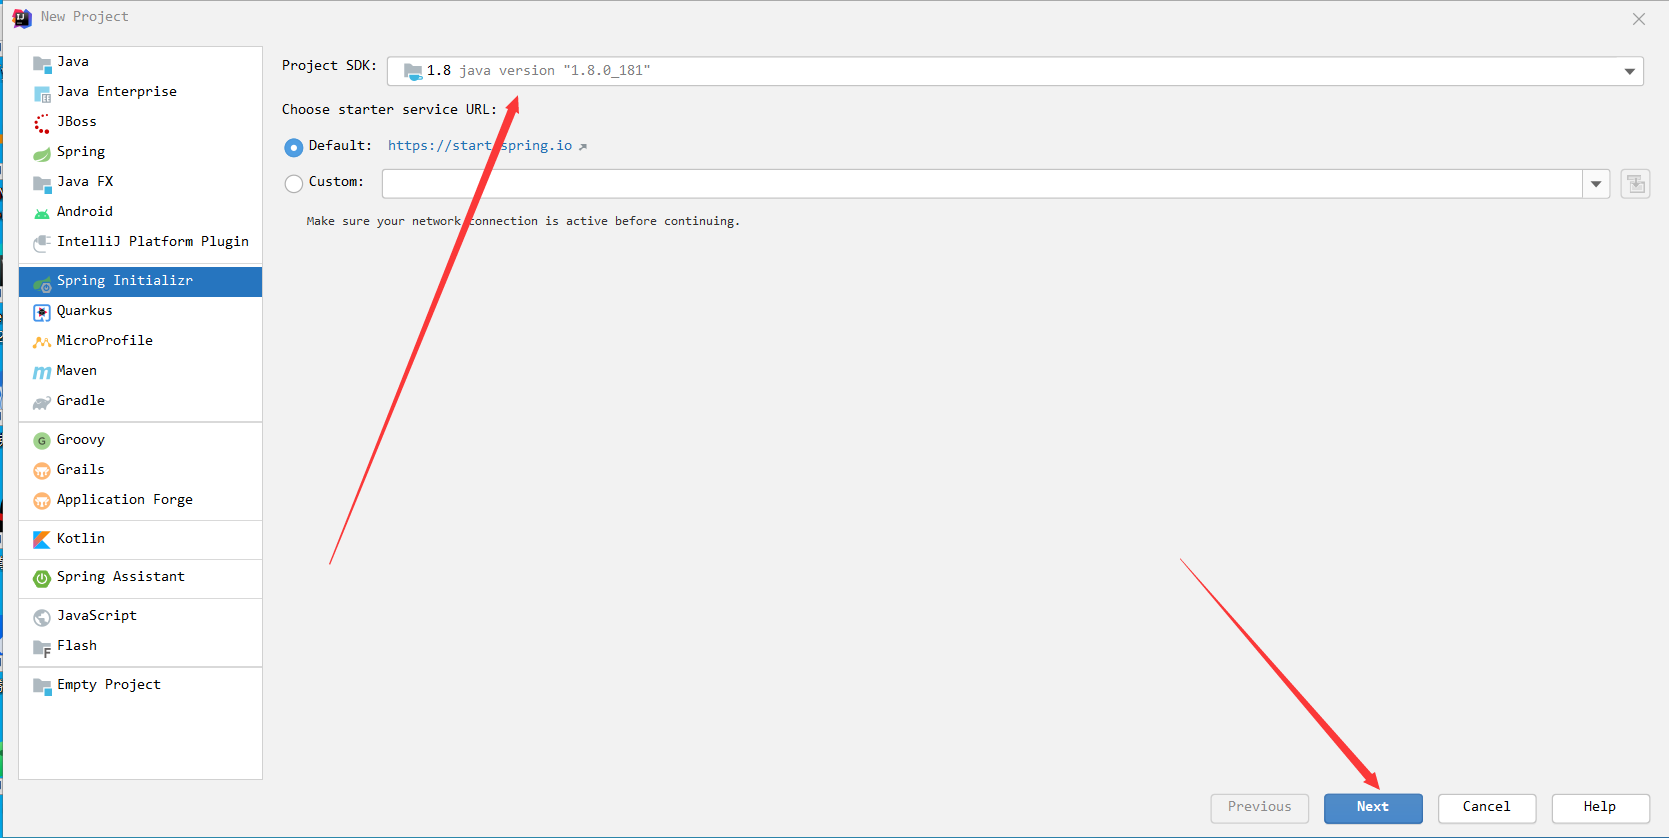
- 设置项目属性
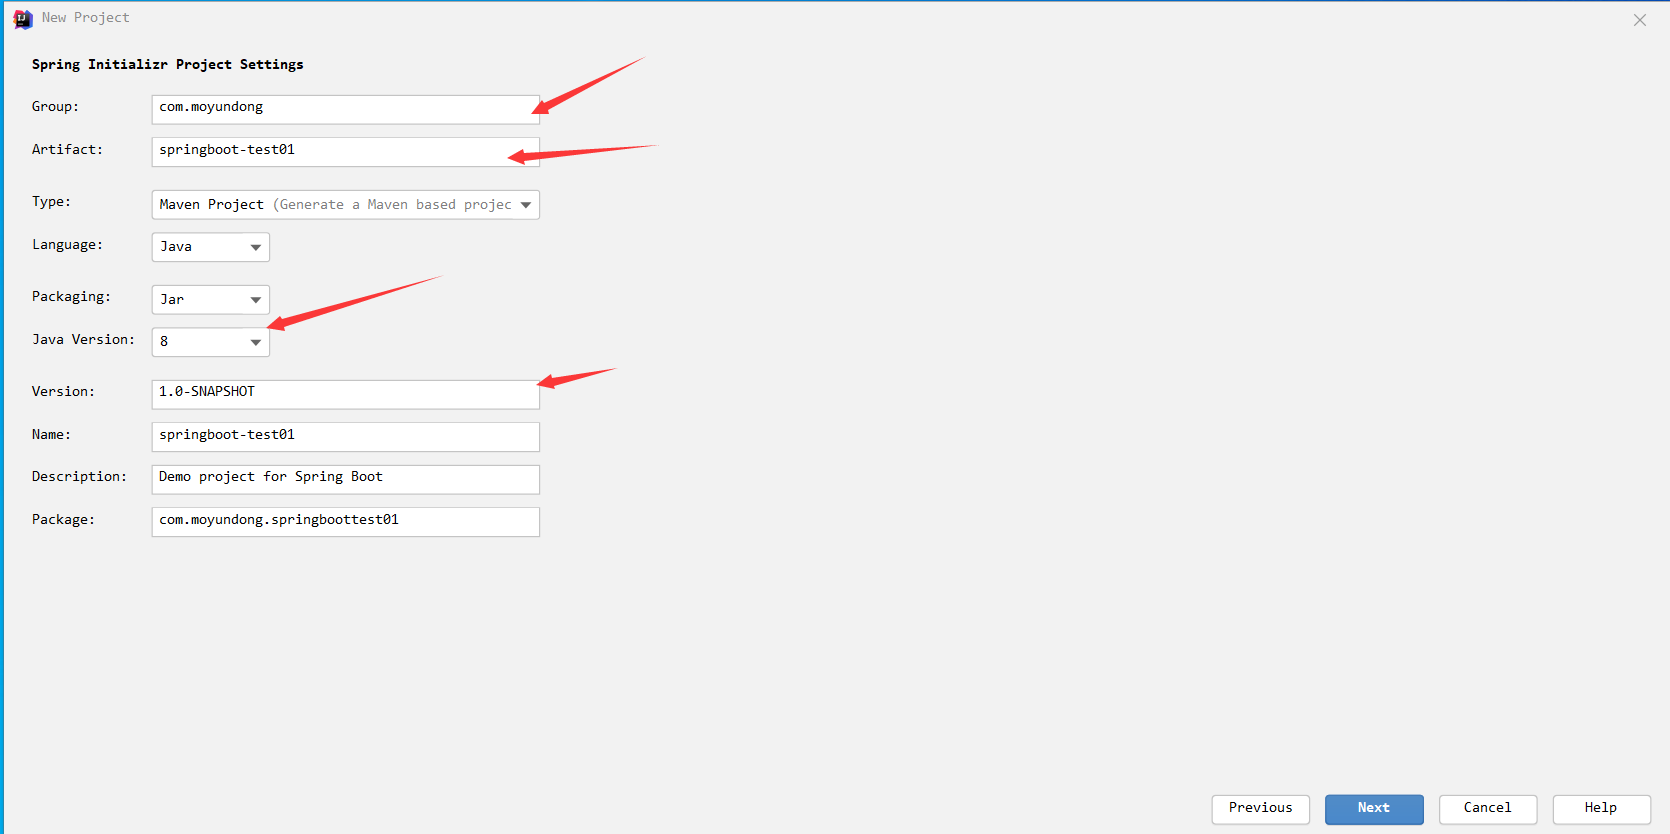
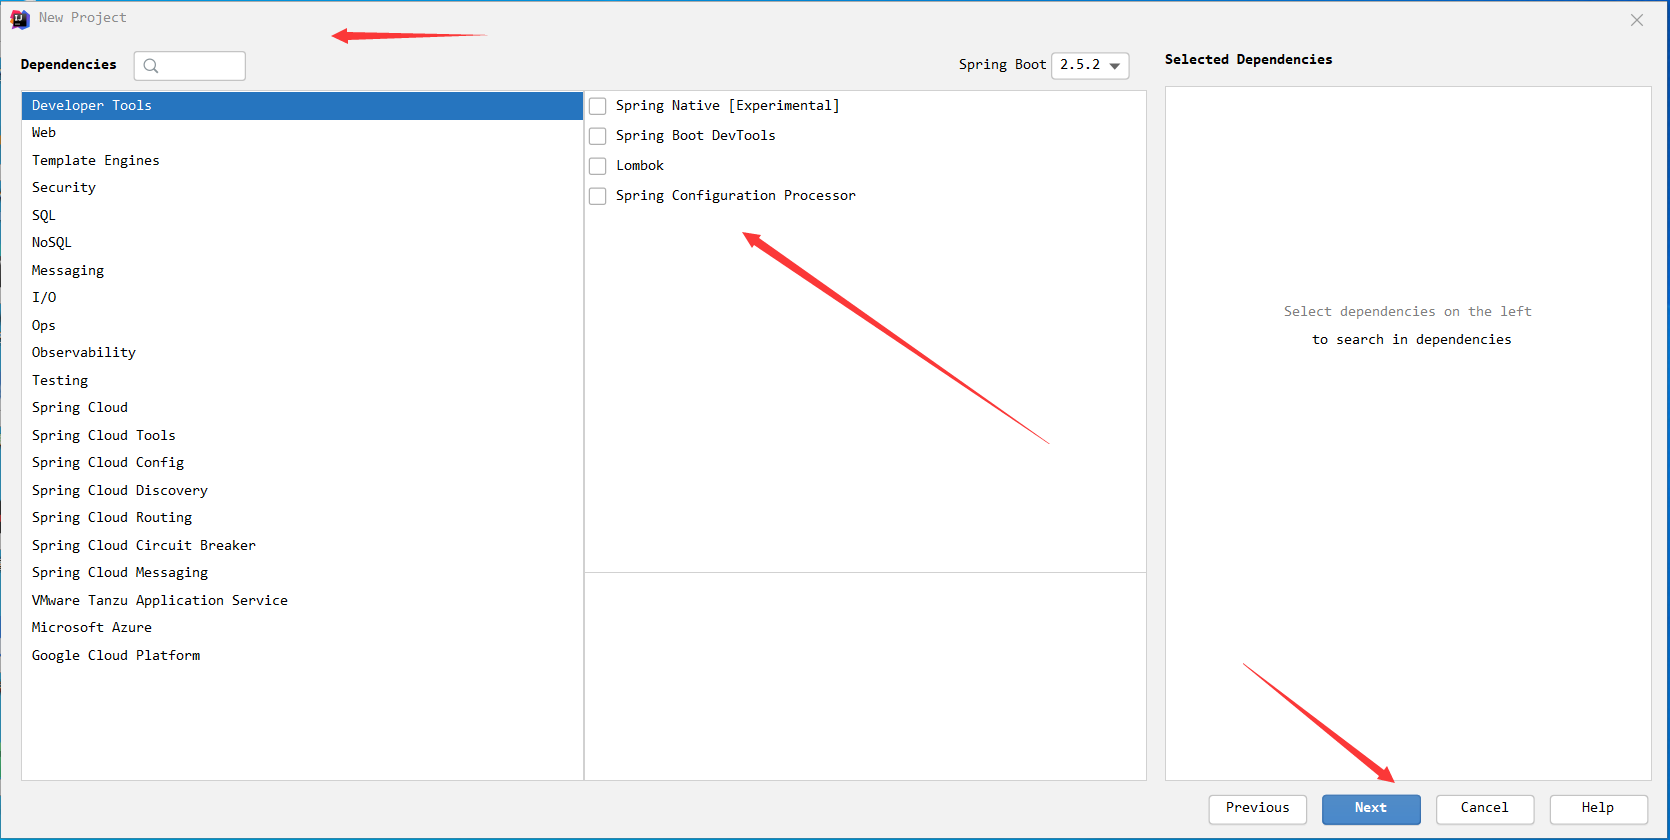
- 添加maven初始化依赖
- 设置项目名称,点击完成
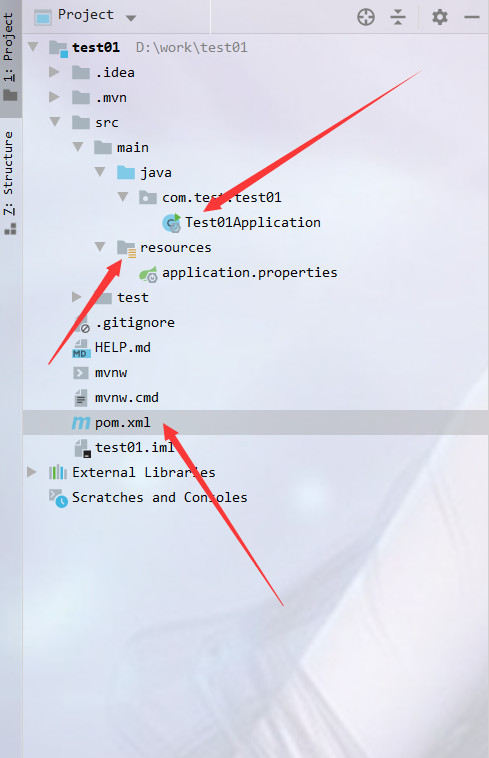
- 创建项目成功之后目录结构
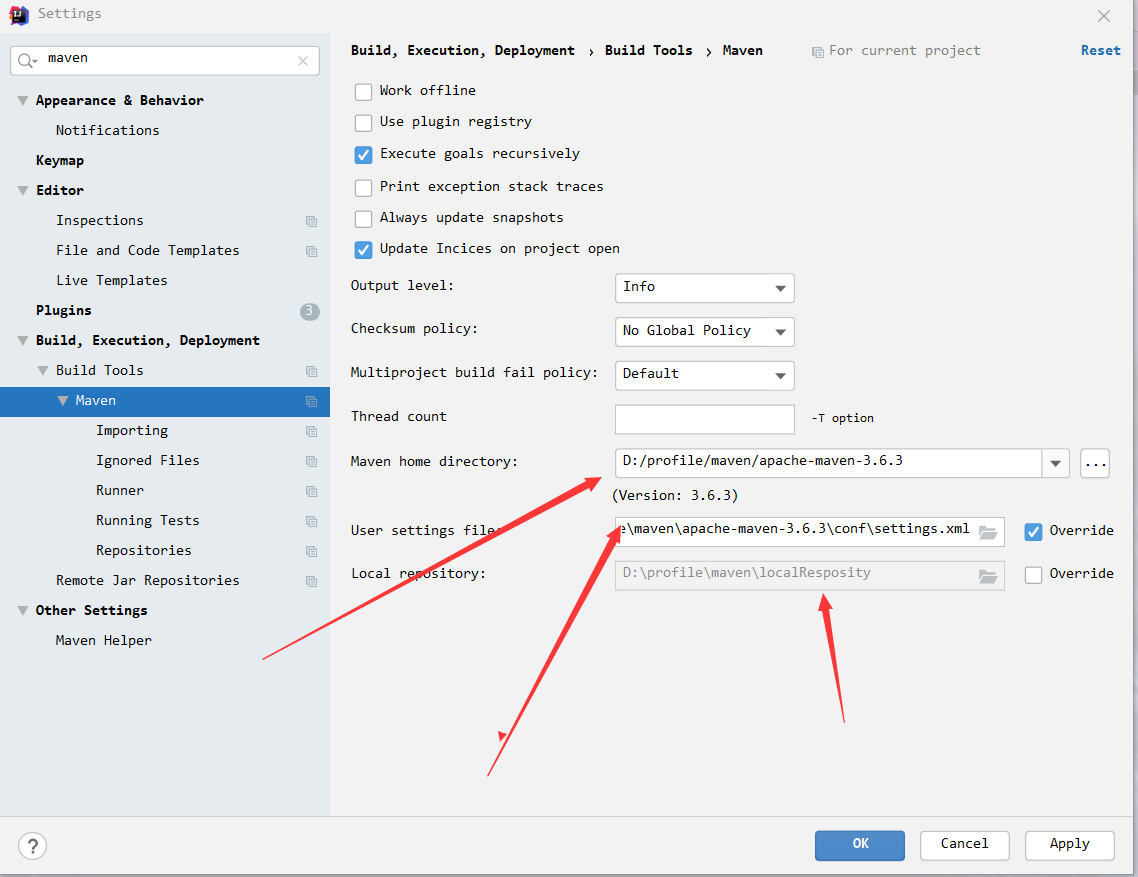
- 配置Maven(File->Setting->Build,Excution,Deployment->Build Tools -> Maven )
# 方案二
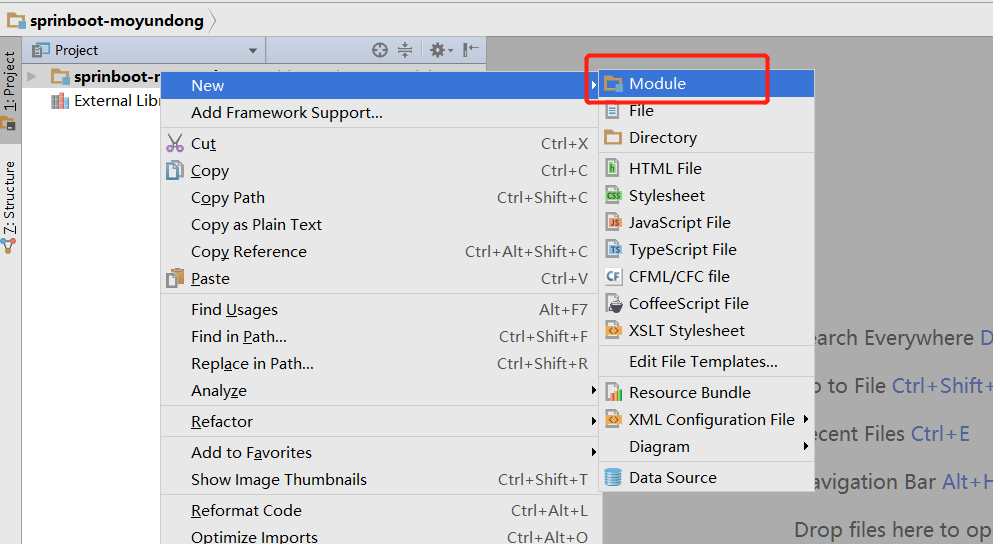
- 创建一个文件夹作为根目录,例如
sprinboot-moyundong,之后的springboot练习demo项目都放到该目录下。使用idea打开sprinboot-moyundong目录。效果如下图所示
- 新建module,new-->module
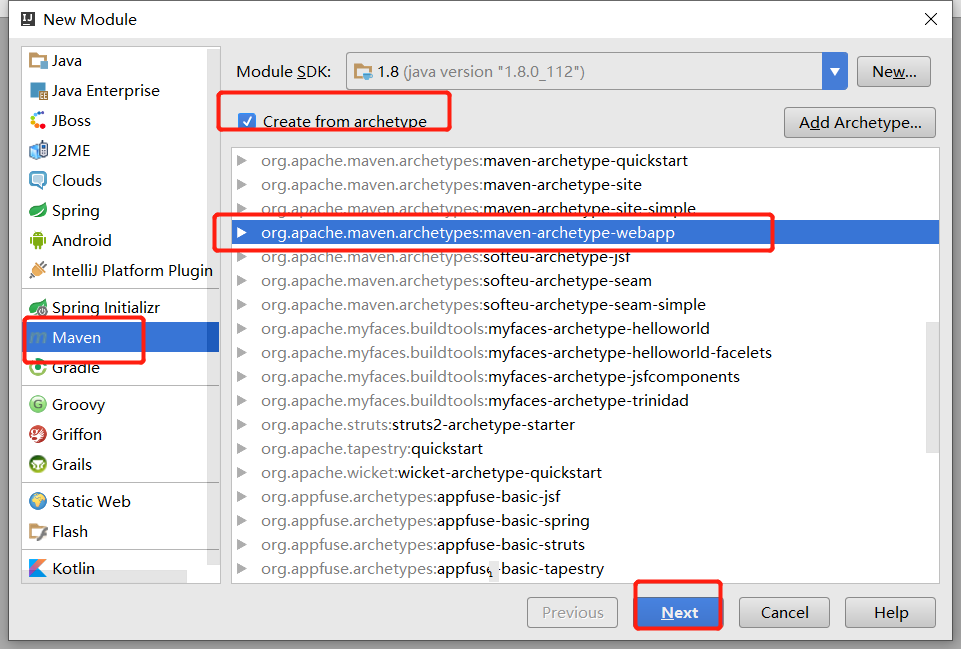
- 选择maven,勾选“create from archetype”,选择如下图所示
- 创建
GroupId和ArtifactId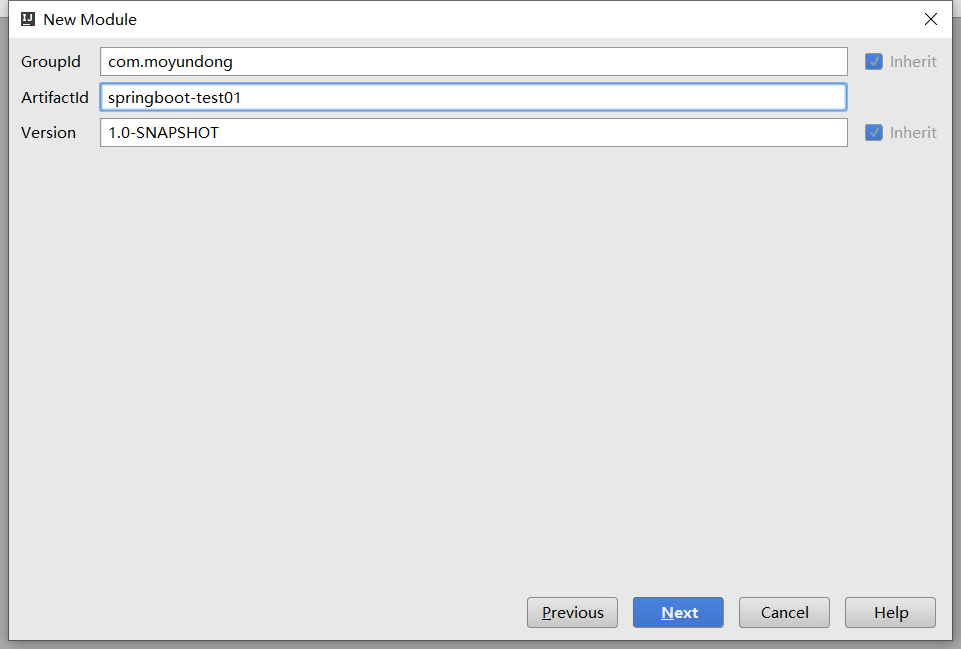
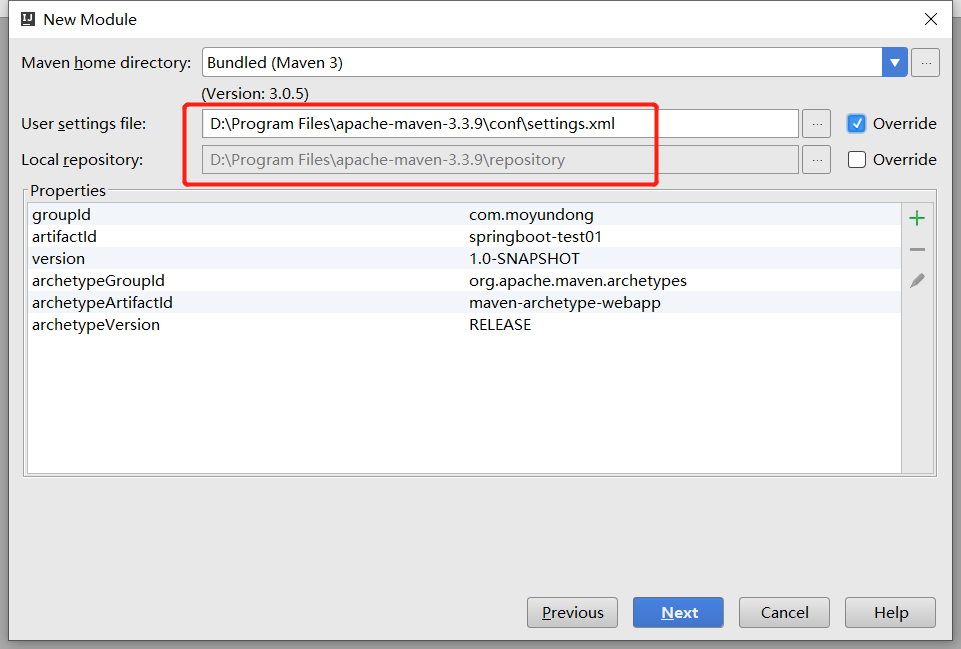
- 配置自己maven, 点击下一步
- 修改module name和
ArtifactId,点击Finish完成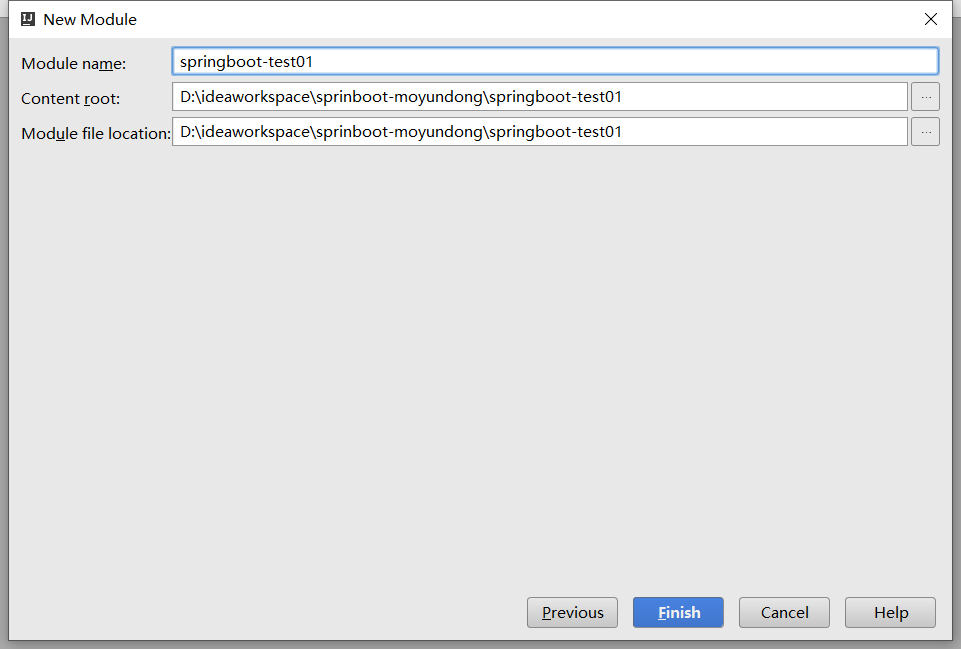
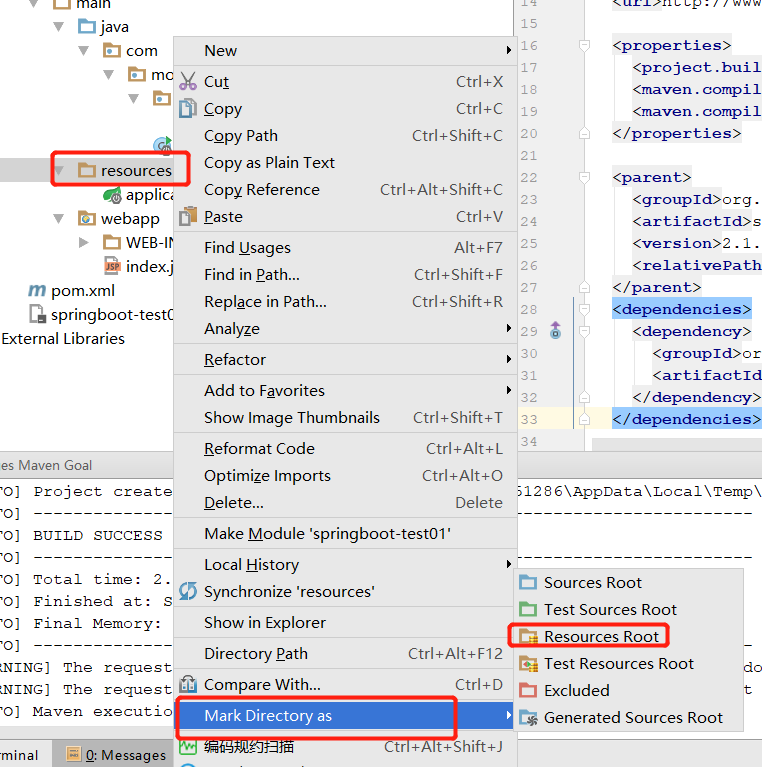
- 项目创建成功后,在main目录下创建java和resources两个目录,随后在java目录下再创建如下图所示的目录结构

- 设置resources目录为Resources root目录(同理设置java目录为Sources root目录)
- 在pom.xml文件中配置springboot依赖,主要是
parent和dependencies。
查看pom.xml示例
<?xml version="1.0" encoding="UTF-8"?>

<project xmlns="http://maven.apache.org/POM/4.0.0" xmlns:xsi="http://www.w3.org/2001/XMLSchema-instance"
  xsi:schemaLocation="http://maven.apache.org/POM/4.0.0 http://maven.apache.org/xsd/maven-4.0.0.xsd">
  <modelVersion>4.0.0</modelVersion>

  <groupId>com.moyundong</groupId>
  <artifactId>springboot-test01</artifactId>
  <version>1.0-SNAPSHOT</version>
  <packaging>war</packaging>

  <name>springboot-test01 Maven Webapp</name>
  <!-- FIXME change it to the project's website -->
  <url>http://www.example.com</url>

  <properties>
    <project.build.sourceEncoding>UTF-8</project.build.sourceEncoding>
    <maven.compiler.source>1.7</maven.compiler.source>
    <maven.compiler.target>1.7</maven.compiler.target>
  </properties>

  <parent>
    <groupId>org.springframework.boot</groupId>
    <artifactId>spring-boot-starter-parent</artifactId>
    <version>2.1.0.RELEASE</version>
    <relativePath/>
  </parent>
  <dependencies>
    <dependency>
      <groupId>org.springframework.boot</groupId>
      <artifactId>spring-boot-starter-web</artifactId>
    </dependency>
  </dependencies>

  <build>
    <finalName>springboot-test01</finalName>
  </build>
</project>
2
3
4
5
6
7
8
9
10
11
12
13
14
15
16
17
18
19
20
21
22
23
24
25
26
27
28
29
30
31
32
33
34
35
36
37
38
# 配置项目
# 配置application.yml
在resources目录下的application.yml配置启动项。我们配置了启动端口(默认配置是8080)为8088,其余配置采用默认值。
server:
  port: 8088
2
# 配置启动类
一个springboot工程只有一个启动类,启动类应放到所有java类的 最前面,我们一般放到和controller包的同级目录就行。启动类写法如下所示,其中Test01Application类的名称可以自定义 只要修改SpringApplication.run(Test01Application.class, args)相应的类名就行。
@SpringBootApplication
public class Test01Application extends SpringBootServletInitializer {
    public static void main(String[] args) throws UnknownHostException {
        SpringApplication.run(Test01Application.class, args);
    }
}
2
3
4
5
6
# 配置接口类
在第二步运行Test01Application的main方法就能启动项目了,但浏览器无法访问,因此创建一个接口类使得浏览器通过接口访问。
创建一个名为Test01Controller 的 controller 类,具体内容如下所示:
@RestController
@RequestMapping("Test01")
public class Test01Controller {
    @RequestMapping("hello")
    public String hello(){
        return "hello springboot!";
    }
}
2
3
4
5
6
7
8
# 运行项目
运行项目,运行Test01Application的main方法就能启动项目了。
# 测试
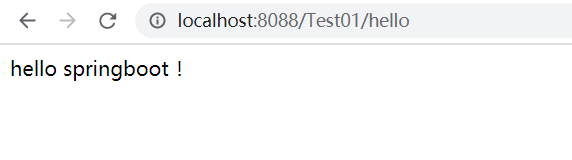
打开浏览器,输入http://localhost:8088/Test01/hello,看到如下效果
# 修改访问路径
默认启动的项目之后访问方式是端口加url路径了。如需在访问路径前加上工程名,直接在application.yml配置servlet context-path,具体配置如下
server:
  port: 8088
  servlet:
      context-path: /moyundong
2
3
4
配置访问路径之后重新运行main方法,此时访问路径是http://localhost:8088/moyundong/Test01/hello
# springboot注解
# 什么是注解
Java 注解(Annotation)又称 Java 标注,是 JDK5.0 引入的一种注释机制。
# 注解的作用
1.采用纯java代码,不在需要配置繁杂的xml文件
2.在配置中也可享受面向对象带来的好处
3.类型安全对重构可以提供良好的支持
4.减少复杂配置文件的同时亦能享受到springIoC容器提供的功能
# 项目配置注解
# 1. @SpringBootConfiguration
@SpringBootConfiguration 注解的作用是标注当前类是配置类,同时会将当前类内声明的一个或多个以@Bean注解标记的方法的实例纳入到srping容器中,并且实例名就是方法名。 示例:
# 2. @EnableAutoConfiguration
@EnableAutoConfiguration是自动配置的注解,这个注解会根据我们添加的组件jar来完成一些默认配置,我们做微服时会添加spring-boot-starter-web这个组件jar的pom依赖,这样配置会默认配置springmvc 和tomcat。
# 3. @ComponentScan
@ComponentScan的作用是定义扫描范围(包),将扫描范围内的被@Component,@Controller,@Service,@Repository注解标记的类纳入到spring容器中进行管理。
package sei.cloud.hctp;

import org.springframework.boot.SpringApplication;
import org.springframework.boot.autoconfigure.SpringBootApplication;
import org.springframework.boot.web.servlet.ServletComponentScan;
import org.springframework.context.annotation.ComponentScan;

@SpringBootApplication
// 扫描sei包下的所有使用@Component,@Controller,@Service,@Repository注解
@ComponentScan(value="sei")
@ServletComponentScan(value = "sei")
public class HctpApplication {

	public static void main(String[] args) {
		SpringApplication.run(HctpApplication.class, args);
	}

}
2
3
4
5
6
7
8
9
10
11
12
13
14
15
16
17
18
# 4. @SpringBootApplication
@SpringBootApplication是一个复合注解 ,该注解的功能是包含 @SpringBootConfiguration,@EnableAutoConfiguration,@ComponentScan三个注解的的功能。示例:
package sei.cloud.hctp;

import org.springframework.boot.SpringApplication;
import org.springframework.boot.autoconfigure.SpringBootApplication;
import org.springframework.boot.web.servlet.ServletComponentScan;
import org.springframework.context.annotation.ComponentScan;

// 1. 将启动类注入到容器
// 2. 启用 SpringBoot 的自动配置机制,帮助SpringBoot应用将所有符合条件的@Configuration配置都加载到当前SpringBoot,并创建对应配置类的Bean,并把该Bean实体交给IOC容器进行管理。
// 3. 指定扫描sei包下面的所有bean
@SpringBootApplication(scanBasePackages="sei")
@ServletComponentScan(value = "sei")
public class HctpApplication {

	public static void main(String[] args) {
		SpringApplication.run(HctpApplication.class, args);
	}

}
2
3
4
5
6
7
8
9
10
11
12
13
14
15
16
17
18
19
# 5. @ImportResource
@ImportResource注解的作用是导入其他xml配置文件,常用于主配置类上,使用方法如下:
package sei.cloud.hctp.config;

import org.springframework.context.annotation.Configuration;
import org.springframework.context.annotation.ImportResource;
// @ImportResource作用是引入applicationContext.xml到配置文件中
@Configuration
@ImportResource(locations={"classpath:applicationContext.xml"})
public class XmlConfiguration {
}
2
3
4
5
6
7
8
9
# 6. @import
@import注解的作用是将一个将普通类注入到spring容器中进行管理 。
package sei.cloud.hctp;

import org.springframework.boot.SpringApplication;
import org.springframework.boot.autoconfigure.SpringBootApplication;
import org.springframework.boot.web.servlet.ServletComponentScan;
import org.springframework.context.annotation.ComponentScan;

// 通过@Import注解把ImportBean添加到IOC容器里面去
@SpringBootApplication
@Import(ImportBean.class)
@ComponentScan(value="sei")
@ServletComponentScan(value = "sei")
public class HctpApplication {

	public static void main(String[] args) {
		SpringApplication.run(HctpApplication.class, args);
	}

}
2
3
4
5
6
7
8
9
10
11
12
13
14
15
16
17
18
19
# 7. @MapperScan
@MapperScan注解是springboot支持mybtis组件的一个注解,此注解用于指定mybatis接口类的路径,进而实现对mybatis的扫描。
package sei.cloud.hctp;

import org.springframework.boot.SpringApplication;
import org.springframework.boot.autoconfigure.SpringBootApplication;
import org.springframework.boot.web.servlet.ServletComponentScan;
import org.springframework.context.annotation.ComponentScan;

// @MapperScan("sei.cloud.dao")的作用是实现包sei.cloud.dao下面类的接口,然后将包下面的所有接口在编译之后实现
@SpringBootApplication
@MapperScan("sei.cloud.dao")
@ComponentScan(value="sei")
@ServletComponentScan(value = "sei")
public class HctpApplication {

	public static void main(String[] args) {
		SpringApplication.run(HctpApplication.class, args);
	}

}
2
3
4
5
6
7
8
9
10
11
12
13
14
15
16
17
18
19
# controller层注解
# 1. @controller
某个类使用 @Controller,即表明这个类是一个控制器类,一般和@RequestMapping来配合使用拦截请求 。当使用这两个注解的类,此时类中的方法用于拦截post和get请求,同时响应对应的请求。
package sei.cloud.hctp.controller;
import org.springframework.web.bind.annotation.*;
import org.springframework.stereotype.Controller;

@Controller
public class TestController {
    @RequestMapping(value = "/hello")
    public ModelAndView hello () {
        System.out.println("hello() 方法被调用");
        ModelAndView mv = new ModelAndView();
        mv.addObject("message", "Hello, Ma Yuzhe!");
        mv.setViewName("/WEB-INF/views/hello.jsp");
        return mv;
    }
}
2
3
4
5
6
7
8
9
10
11
12
13
14
15
# 2. @ResponseBody
@ResponseBody注解的作用是将controller类中的方法返回的对象通过适当的转换器转换为指定的格式之后,写入到response对象的body区,用来返回JSON数据或者是XML数据。
package sei.cloud.hctp.controller;
import org.springframework.web.bind.annotation.*;
import org.springframework.stereotype.Controller;

@Controller
public class TestController {
    @RequestMapping(value = "/hello")
    @ResponseBody
    public ModelAndView hello () {
        System.out.println("hello() 方法被调用");
        ModelAndView mv = new ModelAndView();
        mv.addObject("message", "Hello, Ma Yuzhe!");
        mv.setViewName("/WEB-INF/views/hello.jsp");
        return mv;
    }
}
2
3
4
5
6
7
8
9
10
11
12
13
14
15
16
查看普通风格和Rest风格的区别
| 普通风格 | Rest风格 |
|---|---|
| @RequestMapping(value=“”,method = RequestMethod.GET) | @GetMapping(value =“”) |
| @RequestMapping(value=“”,method = RequestMethod.POST) | @PostMapping(value =“”) |
| @RequestMapping(value=“”,method = RequestMethod.PUT) | @PutMapping(value =“”) |
| @RequestMapping(value=“”,method = RequestMethod.DELETE) | @DeleteMapping(value =“”) |
# 3. @CrossOrigin
@CrossOrigin注解是为了解决跨域访问的问题。这个注解可以为整个controller配置启用跨域,也可以在方法级别启用。
提示
使用方法@CrossOrigin(origins = "", maxAge = 3600)参数含义:
- origins: 允许可访问的域列表
- maxAge:准备响应前的缓存持续的最大时间(以秒为单位)。
- controller方法的CORS配置
package sei.cloud.hctp.controller;
import org.springframework.web.bind.annotation.*;
import org.springframework.stereotype.Controller;

@Controller
public class TestController {
    @RequestMapping(value = "/hello")
    @ResponseBody
    public ModelAndView hello () {
        System.out.println("hello() 方法被调用");
        ModelAndView mv = new ModelAndView();
        mv.addObject("message", "Hello, Ma Yuzhe!");
        mv.setViewName("/WEB-INF/views/hello.jsp");
        return mv;
    }
}
2
3
4
5
6
7
8
9
10
11
12
13
14
15
16
- 为整个controller启用@CrossOrigin
package sei.cloud.hctp.controller;
import org.springframework.web.bind.annotation.*;
import org.springframework.stereotype.Controller;

@CrossOrigin
@Controller
public class TestController {
    @RequestMapping(value = "/hello")
    @ResponseBody
    public ModelAndView hello () {
        System.out.println("hello() 方法被调用");
        ModelAndView mv = new ModelAndView();
        mv.addObject("message", "Hello, Ma Yuzhe!");
        mv.setViewName("/WEB-INF/views/hello.jsp");
        return mv;
    }
}
2
3
4
5
6
7
8
9
10
11
12
13
14
15
16
17
# 4. @Autowired
@Autowired是spring的自动装配,此注解可以使用到 构造器,变量域,方法,注解类型。当我们需要从bean工厂中获取一个bean,Spring会自动装配该bean中标记@Autowired的元素。
package sei.cloud.hctp.controller;
import org.springframework.web.bind.annotation.*;
import org.springframework.stereotype.Controller;
import sei.cloud.htcp.service;

@CrossOrigin
@Controller
public class TestController {
    @Autowired
    UserService userService;

    @RequestMapping(value = "/hello")
    @ResponseBody
    public ModelAndView hello () {
        System.out.println("hello() 方法被调用");
        ModelAndView mv = new ModelAndView();
        mv.addObject("message", "Hello, Ma Yuzhe!");
        mv.setViewName("/WEB-INF/views/hello.jsp");
        return mv;
    }
}
2
3
4
5
6
7
8
9
10
11
12
13
14
15
16
17
18
19
20
21
# 5. @PathVariable
@PathVariable是路径变量注解,常用于@RequestMapping中用{}来定义url部分的变量名。
package sei.cloud.hctp.controller;
import org.springframework.web.bind.annotation.*;
import org.springframework.stereotype.Controller;
import sei.cloud.htcp.service;

@CrossOrigin
@Controller
public class TestController {
    @Autowired
    UserService userService;

    @RequestMapping(value = "/hello")
    @ResponseBody
    public ModelAndView hello () {
        System.out.println("hello() 方法被调用");
        ModelAndView mv = new ModelAndView();
        mv.addObject("message", "Hello, Ma Yuzhe!");
        mv.setViewName("/WEB-INF/views/hello.jsp");
        return mv;
    }

    // @RequestMapping中{id}、{name}需和@PathVariable中的“id”、“name”一致
    @RequestMapping("show5/{id}/{name}")
    public ModelAndView test5(@PathVariable("id") Long ids ,@PathVariable("name") String names){
        ModelAndView mv = new ModelAndView();
        mv.addObject("msg","占位符映射:id:"+ids+";name:"+names);
        mv.setViewName("hello2");
        return mv;
    }
}
2
3
4
5
6
7
8
9
10
11
12
13
14
15
16
17
18
19
20
21
22
23
24
25
26
27
28
29
30
# service层注解
# 1. @Service
@Service注解用于标记业务层的组件,当某个 业务逻辑处理的类使用该注解会自动将该类交给Spring容器进行管理。
package sei.cloud.hctp.service;

@Service("userService")
public class UserServiceImpl implements UserService {
 ………
}
2
3
4
5
6
# 2. @Resource
@Resource注解和@Autowired一样都是用来装配bean,与@Autowired使用规则一致。
package sei.cloud.hctp.controller;
import org.springframework.web.bind.annotation.*;
import org.springframework.stereotype.Controller;
import sei.cloud.htcp.service;

@CrossOrigin
@Controller
public class TestController {
    @Service("userService")
    UserService userService;

    @RequestMapping(value = "/hello")
    @ResponseBody
    public ModelAndView hello () {
        System.out.println("hello() 方法被调用");
        ModelAndView mv = new ModelAndView();
        mv.addObject("message", "Hello, Ma Yuzhe!");
        mv.setViewName("/WEB-INF/views/hello.jsp");
        return mv;
    }
}
2
3
4
5
6
7
8
9
10
11
12
13
14
15
16
17
18
19
20
21
注意
@Resource注解不是spring提供的,是属于J2EE规范的注解。
# 持久层(DAO层)注解
# 1. @Repository
@Repository 注解用于标注DAO类,DAO类一般用于管理、操作数据库的对象。
package sei.cloud.hctp.dao;

@Repository(value="userDao")
public class UserDaoImpl extends BaseDaoImpl<User> {
 ………
}
2
3
4
5
6
提示
@Component, @Service, @Controller, @Repository是spring注解,注解后可以被spring框架所扫描并注入到spring容器来进行管理 @Component是通用注解,其他三个注解是这个注解的拓展,并且具有了特定的功能。
# 2. @Transactional
@Transactional 注解是用于声明事务的注解,常用于类和方法上。
package sei.cloud.hctp.service;

@Service("userService")
public class UserServiceImpl implements UserService {
    @Service("userDao")
    UserDaoImpl userDao;

    @Transactional(propagation = Propagation.REQUIRED)
    @Override
    public void save() {
        User user = new User("服部半藏");
        try {
        	userDao.insertSelective(user);
        } catch(Exception e) {
         	e.printStackTrace();
        }
    }
}
2
3
4
5
6
7
8
9
10
11
12
13
14
15
16
17
18
19
提示
propagation 属性 事务的传播行为,默认值为 Propagation.REQUIRED。 可选的值有:
- Propagation.REQUIRED: 如果当前存在事务,则加入该事务,如果当前不存在事务,则创建一个新的事务。
- Propagation.SUPPORTS: 如果当前存在事务,则加入该事务;如果当前不存在事务,则以非事务的方式继续运行。
- Propagation.MANDATORY: 如果当前存在事务,则加入该事务;如果当前不存在事务,则抛出异常。
- Propagation.REQUIRES_NEW: 重新创建一个新的事务,如果当前存在事务,暂停当前的事务。
- Propagation.NOT_SUPPORTED: 以非事务的方式运行,如果当前存在事务,暂停当前的事务。
- Propagation.NEVER: 以非事务的方式运行,如果当前存在事务,则抛出异常。
- Propagation.NESTED: 和 Propagation.REQUIRED 效果一样。
# springboot属性注入(@value)
# 基本属性注入
springboot通过application.yml给组件传值步骤:
- 在
application.yml文件里面定义变量名称和值,变量名称最好和组件里面一样。例如name: niumowang - 在
controller里面定义一个name变量,例如private String name; - 在变量上面加上
@Value${变量名}注解获取application.yml里面的{变量名}的值,例如@Value("${name}")
通过上面的三步可以做将application.yml里面的name的值注入到controller里面的name`中。
注意
如果注入的变量名为username的时候,${username}取到的值不是我们定义的值,而是取到我们计算机的名称, 因此我们在使用注解的方式传值的时候,变量名最好不要定义为username 。
延申:java的基本类型、数组类型的传值方式与String一致,具体要求如下:
application.yml文件如下所示 :
server:
  port: 8088 # 配置端口
  servlet:
      context-path: /moyundong # 配置项目名称

name: niumowang
age: 18
uuid: 12345678901234
grade: 32.89
price: 18.8888
flag: true
names: 小明,xiaohong,小刚
2
3
4
5
6
7
8
9
10
11
12
TestController文件如下所示 :
@RestController
@RequestMapping("Test")
public class TestController {

    @Value("${name}")
    private String name;
    @Value("${age}")
    private int age;
    @Value("${uuid}")
    private long uuid;
    @Value("${grade}")
    private float grade;
    @Value("${price}")
    private double price;
    @Value("${flag}")
    private boolean flag;
    @Value("${names}")
    private String[] names;

    @RequestMapping("hello")
    public String hello(){
        System.out.println("name="+ name);
        System.out.println("age="+ age);
        System.out.println("uuid="+ uuid);
        System.out.println("grade="+ grade);
        System.out.println("price="+ price);
        System.out.println("flag="+ flag);
        for (String name : names) {
            System.out.println("name="+ name);
        }
        return "hello springboot";
    }
}
2
3
4
5
6
7
8
9
10
11
12
13
14
15
16
17
18
19
20
21
22
23
24
25
26
27
28
29
30
31
32
33
运行结果如下所示 :
name=niumowang
age=18
uuid=12345678901234
grade=32.89
price=18.8888
flag=true
name=小明
name=xiaohong
name=小刚
2
3
4
5
6
7
8
9
# list和map注入
- list定义值的时候,和数组类似,但是注入值的时候需使用
@Value("#{'${变量名}'.split(',')}") - map定义值得时候用一个json格式得数据,例如
maps: "{'name1':'花花','name2':'小草'}",注入得时候用@Value("#{${maps}}")
application.yml文件如下所示 :
strList: str1,str2,str3
maps: "{'name1':'花花','name2':'小草'}"
2
TestController文件如下所示 :
@Value("#{'${strList}'.split(',')}")
private List<String> strList;
@Value("#{${maps}}")
private Map<String,String> maps;
2
3
4
# 静态变量注入
- 当要给静态变量注入值的时候,若是在静态变量声明之上直接添加@Value()注解是无效的
- 若要给静态变量赋值,可以使用set()方法 具体做法如下
person:
  personName: niumowang
  personAge: 18
2
3
TestController文件如下所示 :
private static String personName;
private static int personAge;
@Value("${person.personName}")
public void setPersonName(String ame){
    personName = ame;
}
@Value("${person.personAge}")
public void setPersonAge(int age){
    personAge = age;
}
2
3
4
5
6
7
8
9
10
:: tip 提示
application.yml文件里面定义值得时候如果有父子关系,那么组件里面取值得时候直接父点子就行了,例如上例中 的person.personName 和 person.personAge
:::
# 对象注入
使用@ConfigurationProperties(prefix = "前缀")的方式给一个对象注入值,不用给对象每个属性都注入一遍值。 当然,也可以给每个属性都注入,但是这样太麻烦了。具体要求如下面示例:
在application.yml文件里面定义一个user对象
user:
  id: a123456
  namea: niumowang
  age: 18
  birthday: 1998/01/01
2
3
4
5
创建一个User对象,加上注解@ConfigurationProperties(prefix = "user"),这个里面的前缀user就是 application.yml`文件里面最前面的user,格式就是按照示例那样写,注意空格和缩进代码如下:
@ConfigurationProperties(prefix = "user")
@Component
public class User {
    private String id;
    private String namea;
    private int age;
    private Date birthday;

    @Override
    public String toString() {
        return "User{" +
                "id='" + id + '\'' +
                ", namea='" + namea + '\'' +
                ", age=" + age +
                ", birthday=" + birthday +
                '}';
    }

    public User() {
    }

    public User(String id, String namea, int age, Date birthday) {
        this.id = id;
        this.namea = namea;
        this.age = age;
        this.birthday = birthday;
    }

    public String getId() {
        return id;
    }

    public void setId(String id) {
        this.id = id;
    }

    public String getNamea() {
        return namea;
    }

    public void setNamea(String namea) {
        this.namea = namea;
    }

    public int getAge() {
        return age;
    }

    public void setAge(int age) {
        this.age = age;
    }

    public Date getBirthday() {
        return birthday;
    }

    public void setBirthday(Date birthday) {
        this.birthday = birthday;
    }
}
2
3
4
5
6
7
8
9
10
11
12
13
14
15
16
17
18
19
20
21
22
23
24
25
26
27
28
29
30
31
32
33
34
35
36
37
38
39
40
41
42
43
44
45
46
47
48
49
50
51
52
53
54
55
56
57
58
59
60
然后在TestController文件里面注入User,测试user的值是否注入成功。
@Autowired
private User user;
......
......
System.out.println("user="+ user);
2
3
4
5
运行后结果如下:
user=User{id='a123456', namea='niumowang', age=18, birthday=Thu Jan 01 00:00:00 CST 1998}
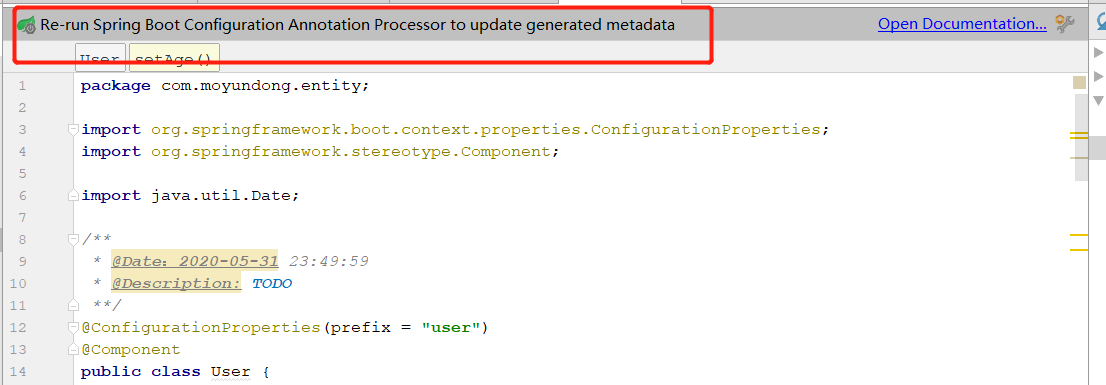
延申:在实体类User上面加上@ConfigurationProperties(prefix = "user")后,idea最上面有个警告
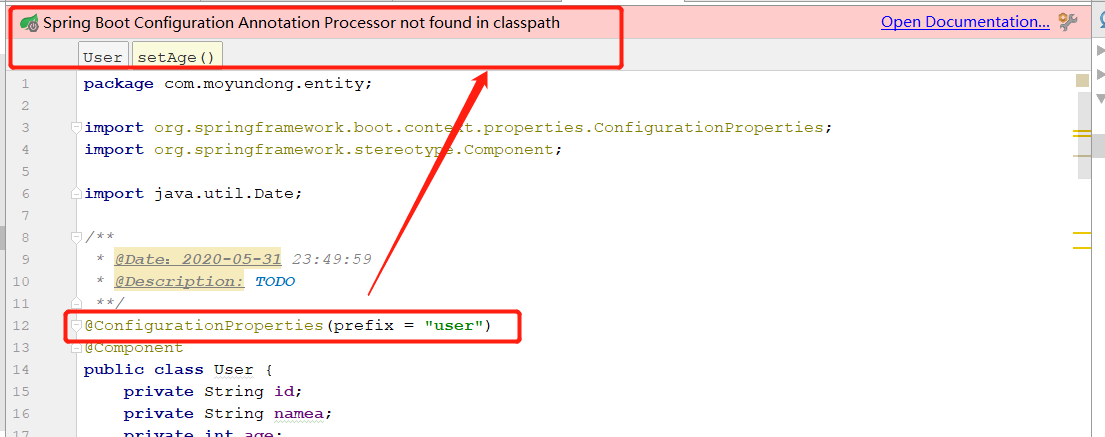
::: details解决上面的问题上面的
我们点击右边的open documentation...,在里面找如下的依赖并且加导pom文件
<!-- 自定义注入时构建元数据,可以让我们写对象的时候有提示信息-->
<dependency>
	<groupId>org.springframework.boot</groupId>
	<artifactId>spring-boot-configuration-processor</artifactId>
	<optional>true</optional>
</dependency>
2
3
4
5
6
加上之后警告就消除了,并且提示我们重新启动下springboot应用。重新启动后,我们还有意外收获,那就是在application.yml文件里面 写user的属性的时候,会有提示信息。
:::
# @ConfigurationProperties 与 @Value 对比
@Value 注解是核心容器功能,它不提供与类型安全配置属性相同的功能。下表总结了 @ConfigurationProperties 和 @Value 支持的功能:
| 功能 | @ConfigurationProperties | @Value |
|---|---|---|
| 宽松绑定 | 是 | 否 |
| 元数据支持 | 是 | 否 |
SpEL 表达式 | 否 | 是 |
如果您要为自己的组件定义一组配置 key,我们建议您将它们分组到使用 @ConfigurationProperties 注解的 POJO 中。您应该知道,由于 @Value 不支持宽松绑定,因此如果您需要通过环境变量来提供值,它并不是一个好的选择。
最后,虽然您可以在 @Value 中编写 SpEL 表达式,但来自应用程序属性文件的此类表达式并不会被处理。
# springboot项目-JDBC
# 新建项目
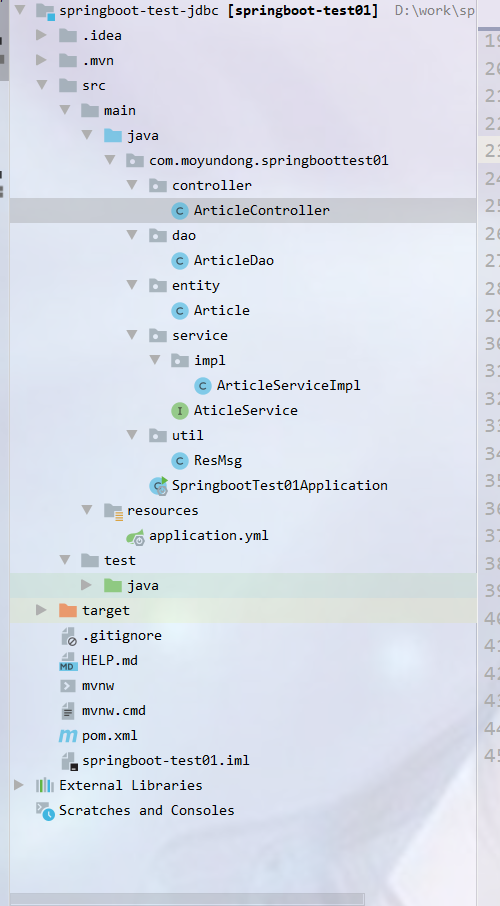
新建一个springboot项目,如若不会,请查看创建项目模块。创建项目之后,创建对应的包、类,配置相应的文件,如项目相关目录结构所示。
# 添加依赖
在pom文件中添加项目springboot-test-jdbc的相关依赖。
<!--jabc依赖-->
<dependency>
    <groupId>org.springframework.boot</groupId>
    <artifactId>spring-boot-starter-jdbc</artifactId>
</dependency>
<!--web依赖-->
<dependency>
    <groupId>org.springframework.boot</groupId>
    <artifactId>spring-boot-starter-web</artifactId>
</dependency>
<!--MySQL依赖-->
<dependency>
    <groupId>mysql</groupId>
    <artifactId>mysql-connector-java</artifactId>
    <scope>runtime</scope>
</dependency>

<!--Swagger 框架-->
<dependency>
    <groupId>io.springfox</groupId>
    <artifactId>springfox-swagger2</artifactId>
    <version>2.9.2</version>
</dependency>

<!--Swagger UI-->
<dependency>
    <groupId>io.springfox</groupId>
    <artifactId>springfox-swagger-ui</artifactId>
    <version>2.9.2</version>
</dependency>
<dependency>
    <groupId>org.springframework.boot</groupId>
    <artifactId>spring-boot-starter-test</artifactId>
    <scope>test</scope>
    <exclusions>
        <exclusion>
            <groupId>org.junit.vintage</groupId>
            <artifactId>junit-vintage-engine</artifactId>
        </exclusion>
    </exclusions>
</dependency>
<!--默认帮我们配置项目组件-->
<dependency>
    <groupId>org.springframework.boot</groupId>
    <artifactId>spring-boot-starter-web</artifactId>
</dependency>
2
3
4
5
6
7
8
9
10
11
12
13
14
15
16
17
18
19
20
21
22
23
24
25
26
27
28
29
30
31
32
33
34
35
36
37
38
39
40
41
42
43
44
45
46
# 配置项目
在application.yml中配置数据源。
server:
  port: 8081

# 配置数据源
spring:
  datasource:
    username: root
    password: 123456
    url: jdbc:mysql://127.0.0.1:3306/blog
    driver-class-name: com.mysql.jdbc.Driver
2
3
4
5
6
7
8
9
10
# 创建数据库表
- 创建springbootdata的数据库
注意
注意与数据用配置的名称一样就可以了。
- 创建tb_article表
-- ----------------------------
-- Table structure for tb_article
-- ----------------------------
DROP TABLE IF EXISTS `tb_article`;
CREATE TABLE `tb_article`  (
  `id` bigint NOT NULL AUTO_INCREMENT,
  `title` varchar(255) CHARACTER SET utf8 COLLATE utf8_general_ci NOT NULL DEFAULT '',
  `summary` varchar(1024) CHARACTER SET utf8 COLLATE utf8_general_ci NOT NULL DEFAULT '',
  `status` int NOT NULL DEFAULT 0,
  `type` int NOT NULL,
  `user_id` bigint NOT NULL DEFAULT 0,
  `create_time` varchar(255) CHARACTER SET utf8 COLLATE utf8_general_ci NOT NULL DEFAULT '',
  `update_time` varchar(255) CHARACTER SET utf8 COLLATE utf8_general_ci NOT NULL DEFAULT '',
  `public_time` varchar(255) CHARACTER SET utf8 COLLATE utf8_general_ci NOT NULL DEFAULT '',
  PRIMARY KEY (`id`) USING BTREE
) ENGINE = InnoDB AUTO_INCREMENT = 3 CHARACTER SET = utf8 COLLATE = utf8_general_ci ROW_FORMAT = Dynamic;

SET FOREIGN_KEY_CHECKS = 1;
2
3
4
5
6
7
8
9
10
11
12
13
14
15
16
17
18
# 创建实体类
在包com.moyundong.springboottest01.entity下创建实体类Article。
查看Article类
private Long id;
    private String title;
    private String summary;
    private String createTime;
    private String publicTime;
    private String updateTime;
    private Long userId;
    private Integer status;
    private Integer type;

    public Long getId() {
        return id;
    }

    public void setId(Long id) {
        this.id = id;
    }

    public String getTitle() {
        return title;
    }

    public void setTitle(String title) {
        this.title = title;
    }

    public String getSummary() {
        return summary;
    }

    public void setSummary(String summary) {
        this.summary = summary;
    }

    public String getCreateTime() {
        return createTime;
    }

    public void setCreateTime(String createTime) {
        this.createTime = createTime;
    }

    public String getPublicTime() {
        return publicTime;
    }

    public void setPublicTime(String publicTime) {
        this.publicTime = publicTime;
    }

    public String getUpdateTime() {
        return updateTime;
    }

    public void setUpdateTime(String updateTime) {
        this.updateTime = updateTime;
    }

    public Long getUserId() {
        return userId;
    }

    public void setUserId(Long userId) {
        this.userId = userId;
    }

    public Integer getStatus() {
        return status;
    }

    public void setStatus(Integer status) {
        this.status = status;
    }

    public Integer getType() {
        return type;
    }

    public void setType(Integer type) {
        this.type = type;
    }
2
3
4
5
6
7
8
9
10
11
12
13
14
15
16
17
18
19
20
21
22
23
24
25
26
27
28
29
30
31
32
33
34
35
36
37
38
39
40
41
42
43
44
45
46
47
48
49
50
51
52
53
54
55
56
57
58
59
60
61
62
63
64
65
66
67
68
69
70
71
72
73
74
75
76
77
78
79
80
81
# 创建ArticleDao类
在包com.moyundong.springboottest01.dao下创建实体类ArticleDao。
- 创建方法实给tb_article增加一条数据
public Long insertArticle(Article article) {
    String sql = "insert into tb_article(title,summary,user_id,create_time,public_time,update_time,status, `type`) " +
                "values(" + article.getTitle() + "," + article.getSummary() + "," + article.getUserId() + "," + article.getStatus() +
                "," + article.getCreateTime() + "," + article.getPublicTime()  + "," + article.getUpdateTime() + "," + article.getType() + ")";
    return  jdbcTemplate.update(sql);
}
2
3
4
5
6
7
8
9
- 实现获取表tb_article全部数据
public List getAllArticle() {
    try {
        List<Map<String, Object>> list = jdbcTemplate.queryForList("select * from tb_article");
        if (list.size() > 0) {
            return list;
        } else {
            return null;
        }
    } catch (Exception e) {
        e.printStackTrace();
        return null;
    }
}
2
3
4
5
6
7
8
9
10
11
12
13
- 根据Id更改表tb_article的title值
public int updateArticle(String title, int id) {
    try {
        if (title != null && id > 0) {
            int result = jdbcTemplate.update("UPDATE tb_article SET title=? WHERE id=?", new Object[] {title, id});
            if (result > 0) {
                return 1;
            }
        }
        return -1;
    } catch (Exception e) {
        e.printStackTrace();
        return -1;
    }
}
2
3
4
5
6
7
8
9
10
11
12
13
14
- 通过Id删除表tb_article中对应数据
public int deleteArticleById(int id) {
    try {
        if (id > 0) {
            int result = jdbcTemplate.update("DELETE FROM tb_article WHERE id=?", new Object[] {id});
            if (result > 0) {
                return 1;
            }
        }
        return -1;
    } catch (Exception e) {
        e.printStackTrace();

        return -1;
    }
}
2
3
4
5
6
7
8
9
10
11
12
13
14
15
查看ArticleDao类全部代码
package com.moyundong.springboottest01.dao;

import com.moyundong.springboottest01.entity.Article;
import org.springframework.beans.factory.annotation.Autowired;
import org.springframework.jdbc.core.JdbcTemplate;
import org.springframework.stereotype.Repository;

import java.util.HashMap;
import java.util.List;
import java.util.Map;

@Repository
public class ArticleDao {
    @Autowired
    private JdbcTemplate jdbcTemplate;

    public Long insertArticle(Article article) {
        String sql = "insert into tb_article(title,summary,user_id,create_time,public_time,update_time,status, `type`) " +
                "values(" + article.getTitle() + "," + article.getSummary() + "," + article.getUserId() + "," + article.getStatus() +
                "," + article.getCreateTime() + "," + article.getPublicTime()  + "," + article.getUpdateTime() + "," + article.getType() + ")";
        return  jdbcTemplate.update(sql);
    }

    public List getAllArticle() {
        try {
            List<Map<String, Object>> list = jdbcTemplate.queryForList("select * from tb_article");
            if (list.size() > 0) {
                return list;
            } else {
                return null;
            }
        } catch (Exception e) {
            e.printStackTrace();
            return null;
        }
    }

    public int updateArticle(String title, int id) {
        try {
            if (title != null && id > 0) {
                int result = jdbcTemplate.update("UPDATE tb_article SET title=? WHERE id=?", new Object[] {title, id});
                if (result > 0) {
                    return 1;
                }
            }
            return -1;
        } catch (Exception e) {
            e.printStackTrace();

            return -1;
        }
    }

    public int deleteArticleById(int id) {
        try {
            if (id > 0) {
                int result = jdbcTemplate.update("DELETE FROM tb_article WHERE id=?", new Object[] {id});
                if (result > 0) {
                    return 1;
                }
            }
            return -1;
        } catch (Exception e) {
            e.printStackTrace();

            return -1;
        }
    }
}
2
3
4
5
6
7
8
9
10
11
12
13
14
15
16
17
18
19
20
21
22
23
24
25
26
27
28
29
30
31
32
33
34
35
36
37
38
39
40
41
42
43
44
45
46
47
48
49
50
51
52
53
54
55
56
57
58
59
60
61
62
63
64
65
66
67
68
69
# 创建service接口
在包com.moyundong.springboottest01.service下创建service接口ArticleSerice。
package com.moyundong.springboottest01.service;

import com.moyundong.springboottest01.entity.Article;
import com.moyundong.springboottest01.util.ResMsg;

public interface AticleService {
    ResMsg insertArticle(Article article);

    ResMsg getAllArticle();

    ResMsg updateArticle(String title, int id);

    ResMsg deleteArticleById(int id);
}
2
3
4
5
6
7
8
9
10
11
12
13
14
# 创建service实现类
在包com.moyundong.springboottest01.service.impl下创建service接口实现类ArticleSericeImpl。
- 实现AticleService接口中insertArticle的方法
public Long insertArticle(Article article) {
    ResMsg resMsg = new ResMsg();
    if (article != null) {
        int a = articleDao.insertArticle(article);
        if (a > 0) {
            resMsg.setCodeMessage(1, "添加成功");
        } else {
            resMsg.setCodeMessage(-1, "添加失败");
        }
        return resMsg;
    } else {
        resMsg.setCodeMessage(-1, "添加失败");
        return resMsg;
    }
}
2
3
4
5
6
7
8
9
10
11
12
13
14
15
- 实现AticleService接口中getAllArticle的方法
public ResMsg getAllArticle() {
    ResMsg resMsg = new ResMsg();

    List list = articleDao.getAllArticle();
    if (list != null) {
        resMsg.setCode(1);
        resMsg.setMessage("查询成功");
        resMsg.addData("list", list);

    } else {
        resMsg.setCodeMessage(-1, "查询错误");
    }
    return resMsg;
}
2
3
4
5
6
7
8
9
10
11
12
13
14
- 实现AticleService接口中updateArticle的方法
public ResMsg updateArticle(String title, int id) {
    ResMsg resMsg = new ResMsg();
    if (title != null && id > 0) {
        int a = articleDao.updateArticle(title, id);
        if (a == -1) {
            resMsg.setCodeMessage(-1, "查询错误");
        } else {
            resMsg.setCodeMessage(1, "修改成功");
        }
    }

    return resMsg;
}
2
3
4
5
6
7
8
9
10
11
12
13
- 实现AticleService接口中deleteArticleById的方法
public ResMsg deleteArticleById(int id) {
    ResMsg resMsg = new ResMsg(1);

    if (id > 0) {
        int result = articleDao.deleteArticleById(id);
        if (result == 1) {
            resMsg.setCodeMessage(1, "删除成功");
            return resMsg;
        }
    }

    resMsg.setCodeMessage(-1, "删除成功");
    return resMsg;
}
2
3
4
5
6
7
8
9
10
11
12
13
14
查看完整ArticleServiceImpl代码
package com.moyundong.springboottest01.service.impl;

import com.moyundong.springboottest01.dao.ArticleDao;
import com.moyundong.springboottest01.service.AticleService;
import com.moyundong.springboottest01.entity.Article;
import com.moyundong.springboottest01.util.ResMsg;
import org.springframework.stereotype.Service;

import javax.annotation.Resource;
import java.util.List;
import java.util.concurrent.locks.ReentrantReadWriteLock;

@Service
public class ArticleServiceImpl implements AticleService {
    @Resource
    ArticleDao articleDao;

    @Override
    public Long insertArticle(Article article) {
        ResMsg resMsg = new ResMsg();
        if (article != null) {
            int a = articleDao.insertArticle(article);
            if (a > 0) {
                resMsg.setCodeMessage(1, "添加成功");
            } else {
                resMsg.setCodeMessage(-1, "添加失败");
            }
            return resMsg;
        } else {
            resMsg.setCodeMessage(-1, "添加失败");
            return resMsg;
        }
    }

    @Override
    public ResMsg getAllArticle() {
        ResMsg resMsg = new ResMsg();

        List list = articleDao.getAllArticle();
        if (list != null) {
            resMsg.setCode(1);
            resMsg.setMessage("查询成功");
            resMsg.addData("list", list);

        } else {
            resMsg.setCodeMessage(-1, "查询错误");
        }
        return resMsg;
    }

    @Override
    public ResMsg updateArticle(String title, int id) {
        ResMsg resMsg = new ResMsg();
        if (title != null && id > 0) {
            int a = articleDao.updateArticle(title, id);
            if (a == -1) {
                resMsg.setCodeMessage(-1, "查询错误");
            } else {
                resMsg.setCodeMessage(1, "修改成功");
            }
        }

        return resMsg;
    }

    @Override
    public ResMsg deleteArticleById(int id) {
        ResMsg resMsg = new ResMsg(1);

        if (id > 0) {
            int result = articleDao.deleteArticleById(id);
            if (result == 1) {
                resMsg.setCodeMessage(1, "删除成功");
                return resMsg;
            }
        }

        resMsg.setCodeMessage(-1, "删除成功");
        return resMsg;
    }
}
2
3
4
5
6
7
8
9
10
11
12
13
14
15
16
17
18
19
20
21
22
23
24
25
26
27
28
29
30
31
32
33
34
35
36
37
38
39
40
41
42
43
44
45
46
47
48
49
50
51
52
53
54
55
56
57
58
59
60
61
62
63
64
65
66
67
68
69
70
71
72
73
74
75
76
77
78
79
80
81
82
# 创建controller
在包com.moyundong.springboottest01.controller下创建类ArticleController。
package com.moyundong.springboottest01.controller;
import com.moyundong.springboottest01.entity.Article;
import com.moyundong.springboottest01.service.impl.ArticleServiceImpl;
import com.moyundong.springboottest01.util.ResMsg;
import io.swagger.annotations.Api;
import io.swagger.annotations.ApiOperation;
import org.springframework.beans.factory.annotation.Autowired;
import org.springframework.stereotype.Controller;
import org.springframework.web.bind.annotation.RequestMapping;
import org.springframework.web.bind.annotation.RequestParam;
import org.springframework.web.bind.annotation.RestController;
import java.util.List;
@Api(tags = "用户api详情")
@RestController
public class ArticleController {
@Autowired
private ArticleServiceImpl articleService;
@RequestMapping(value = "/insertArticle")
@ApiOperation(value = "插入数据",notes = "插入一条新数据")
public ResMsg insertArticle (@RequestBody Article article) {
return articleService.insertArticle(article);
}
@RequestMapping(value = "/getAll")
@ApiOperation(value = "用户查询",notes = "获取所有的用户")
public ResMsg getAllArticle () {
return articleService.getAllArticle();
}
@RequestMapping(value = "/updateTitle")
@ApiOperation(value = "修改数据",notes = "修改title")
public ResMsg updateTitle (@RequestParam String title, @RequestParam int id) {
return articleService.updateArticle(title, id);
}
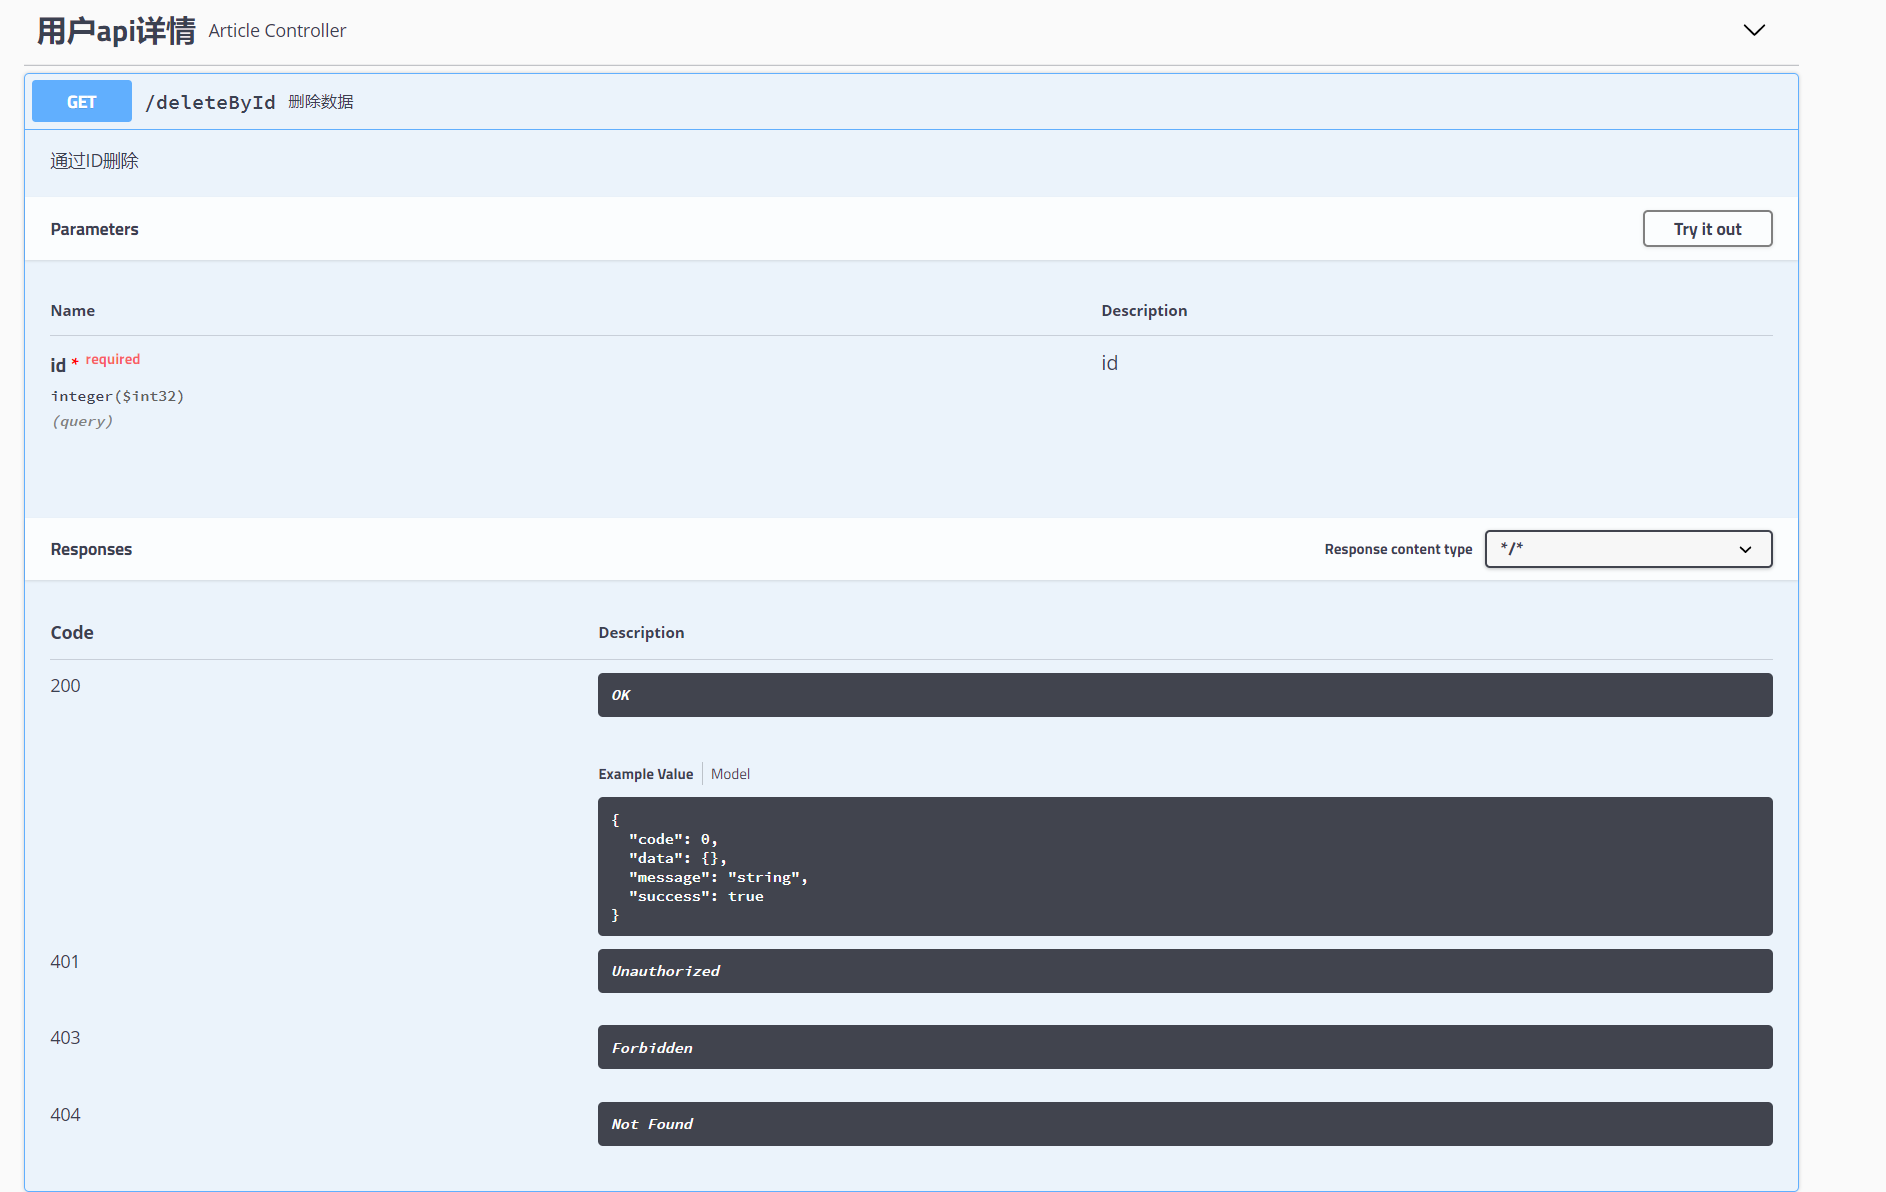
@RequestMapping(value = "/deleteById")
@ApiOperation(value = "删除数据",notes = "通过ID删除")
public ResMsg deleteById (@RequestParam int id) {
return articleService.deleteArticleById(id);
}
}
2
3
4
5
6
7
8
9
10
11
12
13
14
15
16
17
18
19
20
21
22
23
24
25
26
27
28
29
30
31
32
33
34
35
36
37
38
39
40
41
42
43
44
45
# 创建启动类
在包com.moyundong.springboottest01下创建启动类SpringbootTest01Application。
package com.moyundong.springboottest01;

import org.springframework.boot.SpringApplication;
import org.springframework.boot.autoconfigure.SpringBootApplication;
import org.springframework.context.annotation.ComponentScan;
import springfox.documentation.swagger2.annotations.EnableSwagger2;

@SpringBootApplication
@ComponentScan(value = {"com"})
@EnableSwagger2
public class SpringbootTest01Application {

    public static void main(String[] args) {
        SpringApplication.run(SpringbootTest01Application.class, args);
    }

}
2
3
4
5
6
7
8
9
10
11
12
13
14
15
16
17
# 创建返回结果类
在包com.moyundong.springboottest01.util下创建返回结果类ResMsg。
查看ResMsg完整代码
package com.moyundong.springboottest01.util;

import io.swagger.annotations.ApiModelProperty;
import org.springframework.lang.NonNull;

import java.io.Serializable;
import java.util.Collections;
import java.util.HashMap;
import java.util.List;
import java.util.Map;

/**
 * @Author Xudaoxu
 * @create 2021-07-15 2021/7/15
 */
public class ResMsg<T> implements Serializable {
    private static final long serialVersionUID = -2946579545083632979L;
    @ApiModelProperty(
            value = "成功标识;0:失败;1:成功;2:部分成功;-2:未登录;-3:未权限",
            required = true
    )
    private int code = 0;
    @ApiModelProperty(
            value = "描述信息",
            required = true
    )
    private String message;
    @ApiModelProperty("附加数据")
    private Map data = null;
    private T extData = null;

    public ResMsg() {
    }

    public ResMsg(String errMessage) {
        this.message = errMessage;
    }

    public ResMsg(int code) {
        this.code = code;
    }

    public ResMsg(int code, @NonNull String message) {
        this.code = code;
        this.message = message;
    }

    public ResMsg(int code, Map map) {
        this.code = code;
        this.data = map;
    }

    public ResMsg(int code, List list) {
        this.code = code;
        this.addData("rows", list == null ? Collections.EMPTY_LIST : list);
    }

    public ResMsg(int code, List list, long total) {
        this.code = code;
        this.addData("rows", list == null ? Collections.EMPTY_LIST : list);
        this.addData("total", total);
    }

    public ResMsg(int code, @NonNull String message, Map map) {
        this.code = code;
        this.message = message;
        this.data = map;
    }

    public void addMessage(@NonNull String message) {
        if (this.message != null) {
            this.message = this.message + "\n";
        }

        this.message = this.message + message;
    }

    public void setCodeMessage(int code, @NonNull String message) {
        this.code = code;
        this.message = message;
    }

    public boolean isSuccess() {
        return 1 == this.code;
    }

    public int getCode() {
        return this.code;
    }

    public void setCode(int code) {
        this.code = code;
    }

    public String getMessage() {
        return this.message;
    }

    public void setMessage(String message) {
        this.message = message;
    }

    public Map getData() {
        return this.data;
    }

    public <T> T getDataItem(String key) {
        return this.data == null ? null : (T) this.data.get(key);
    }

    public void setData(Map data) {
        this.data = data;
    }

    public void addData(@NonNull String key, Object data) {
        if (this.data == null) {
            this.data = new HashMap(2);
        }

        this.data.put(key, data);
    }

    public <T> T removeData(@NonNull String key) {
        return this.data != null ? (T) this.data.remove(key) : null;
    }

    public void setRows(List list) {
        this.addData("rows", list == null ? Collections.EMPTY_LIST : list);
    }

    public void setExtData(T extData) {
        this.extData = extData;
    }
}
2
3
4
5
6
7
8
9
10
11
12
13
14
15
16
17
18
19
20
21
22
23
24
25
26
27
28
29
30
31
32
33
34
35
36
37
38
39
40
41
42
43
44
45
46
47
48
49
50
51
52
53
54
55
56
57
58
59
60
61
62
63
64
65
66
67
68
69
70
71
72
73
74
75
76
77
78
79
80
81
82
83
84
85
86
87
88
89
90
91
92
93
94
95
96
97
98
99
100
101
102
103
104
105
106
107
108
109
110
111
112
113
114
115
116
117
118
119
120
121
122
123
124
125
126
127
128
129
130
131
132
133
134
# 测试
在浏览器中输入http://localhost:8081/swagger-ui.html进入swagger界面进行测试
提示
如果不会swagger,请查看springboot集成swagger
# 项目相关目录
项目目录结构如下图所示:
# springboot项目-mybatis
# 新建项目
新建一个springboot项目,如若不会,请查看创建项目模块。
# 添加依赖
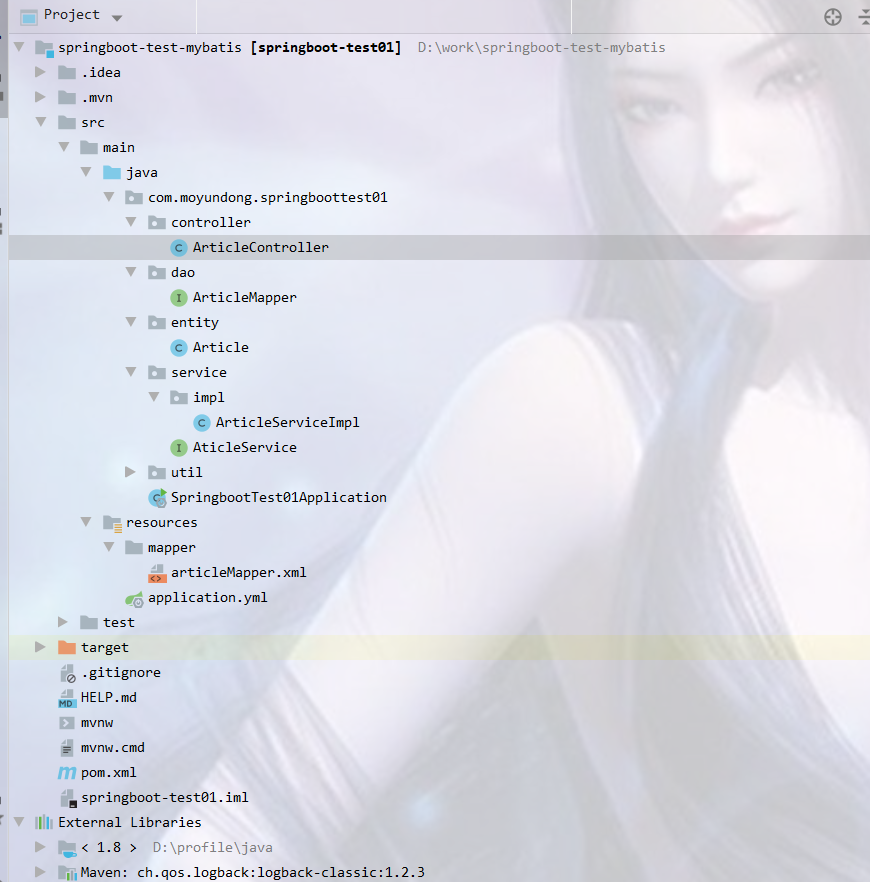
在pom文件中添加项目springboot-test-mybatis的相关依赖项目相关目录
<!--jabc依赖-->
<dependency>
    <groupId>org.springframework.boot</groupId>
    <artifactId>spring-boot-starter-jdbc</artifactId>
</dependency>
<!--web依赖-->
<dependency>
    <groupId>org.springframework.boot</groupId>
    <artifactId>spring-boot-starter-web</artifactId>
</dependency>
<!--MySQL依赖-->
<dependency>
    <groupId>mysql</groupId>
    <artifactId>mysql-connector-java</artifactId>
    <scope>runtime</scope>
</dependency>

<!--Swagger 框架-->
<dependency>
    <groupId>io.springfox</groupId>
    <artifactId>springfox-swagger2</artifactId>
    <version>2.9.2</version>
</dependency>

<!--Swagger UI-->
<dependency>
    <groupId>io.springfox</groupId>
    <artifactId>springfox-swagger-ui</artifactId>
    <version>2.9.2</version>
</dependency>
<dependency>
    <groupId>org.springframework.boot</groupId>
    <artifactId>spring-boot-starter-test</artifactId>
    <scope>test</scope>
    <exclusions>
        <exclusion>
            <groupId>org.junit.vintage</groupId>
            <artifactId>junit-vintage-engine</artifactId>
        </exclusion>
    </exclusions>
</dependency>
<!--默认帮我们配置项目组件-->
<dependency>
    <groupId>org.springframework.boot</groupId>
    <artifactId>spring-boot-starter-web</artifactId>
</dependency>
<!--添加mybatis组件-->
<dependency>
    <groupId>org.mybatis.spring.boot</groupId>
    <artifactId>mybatis-spring-boot-starter</artifactId>
    <version>1.3.5</version>
</dependency>
2
3
4
5
6
7
8
9
10
11
12
13
14
15
16
17
18
19
20
21
22
23
24
25
26
27
28
29
30
31
32
33
34
35
36
37
38
39
40
41
42
43
44
45
46
47
48
49
50
51
52
# 配置项目
在application.yml中配置数据源。
server:
  port: 8081

# 配置数据源
spring:
  datasource:
    username: root
    password: 123456
    url: jdbc:mysql://127.0.0.1:3306/blog
    driver-class-name: com.mysql.jdbc.Driver
# 添加mybaits配置文件
mybatis:
  mapper-locations: classpath:mapper/*.xml # mybatis的路径,我们放到resources下的com/mapper文件夹下面
  type-aliases-package: com.moyundong.springboottest01.entity # 默认别名就是实体类名,或者类名首字母小写 SysUser | sysUser
2
3
4
5
6
7
8
9
10
11
12
13
14
15
# 创建数据库表
创建blog的数据库
注意
注意与数据用配置的名称一样就可以了。
创建tb_article表
-- ----------------------------
-- Table structure for tb_article
-- ----------------------------
DROP TABLE IF EXISTS `tb_article`;
CREATE TABLE `tb_article`  (
  `id` bigint NOT NULL AUTO_INCREMENT,
  `title` varchar(255) CHARACTER SET utf8 COLLATE utf8_general_ci NOT NULL DEFAULT '',
  `summary` varchar(1024) CHARACTER SET utf8 COLLATE utf8_general_ci NOT NULL DEFAULT '',
  `status` int NOT NULL DEFAULT 0,
  `type` int NOT NULL,
  `user_id` bigint NOT NULL DEFAULT 0,
  `create_time` varchar(255) CHARACTER SET utf8 COLLATE utf8_general_ci NOT NULL DEFAULT '',
  `update_time` varchar(255) CHARACTER SET utf8 COLLATE utf8_general_ci NOT NULL DEFAULT '',
  `public_time` varchar(255) CHARACTER SET utf8 COLLATE utf8_general_ci NOT NULL DEFAULT '',
  PRIMARY KEY (`id`) USING BTREE
) ENGINE = InnoDB AUTO_INCREMENT = 3 CHARACTER SET = utf8 COLLATE = utf8_general_ci ROW_FORMAT = Dynamic;

SET FOREIGN_KEY_CHECKS = 1;
2
3
4
5
6
7
8
9
10
11
12
13
14
15
16
17
18
# 创建实体类
在包com.moyundong.springboottest01.entity下创建实体类Article。
查看Article类
public class Article() {
	private Long id;
    private String title;
    private String summary;
    private String createTime;
    private String publicTime;
    private String updateTime;
    private Long userId;
    private Integer status;
    private Integer type;

    public Long getId() {
        return id;
    }

    public void setId(Long id) {
        this.id = id;
    }

    public String getTitle() {
        return title;
    }

    public void setTitle(String title) {
        this.title = title;
    }

    public String getSummary() {
        return summary;
    }

    public void setSummary(String summary) {
        this.summary = summary;
    }

    public String getCreateTime() {
        return createTime;
    }

    public void setCreateTime(String createTime) {
        this.createTime = createTime;
    }

    public String getPublicTime() {
        return publicTime;
    }

    public void setPublicTime(String publicTime) {
        this.publicTime = publicTime;
    }

    public String getUpdateTime() {
        return updateTime;
    }

    public void setUpdateTime(String updateTime) {
        this.updateTime = updateTime;
    }

    public Long getUserId() {
        return userId;
    }

    public void setUserId(Long userId) {
        this.userId = userId;
    }

    public Integer getStatus() {
        return status;
    }

    public void setStatus(Integer status) {
        this.status = status;
    }

    public Integer getType() {
        return type;
    }

    public void setType(Integer type) {
        this.type = type;
    }
}
2
3
4
5
6
7
8
9
10
11
12
13
14
15
16
17
18
19
20
21
22
23
24
25
26
27
28
29
30
31
32
33
34
35
36
37
38
39
40
41
42
43
44
45
46
47
48
49
50
51
52
53
54
55
56
57
58
59
60
61
62
63
64
65
66
67
68
69
70
71
72
73
74
75
76
77
78
79
80
81
82
83
# 创建ArticleMapper接口
在包com.moyundong.springboottest01.dao下创建Mapper接口ArticleMapper。
package com.moyundong.springboottest01.dao;

import com.moyundong.springboottest01.entity.Article;
import org.springframework.beans.factory.annotation.Autowired;
import org.springframework.jdbc.core.JdbcTemplate;
import org.springframework.stereotype.Repository;

import java.util.HashMap;
import java.util.List;
import java.util.Map;

@Repository
public interface ArticleMapper {

    public int insertArticle(Article article);

    public List<Article> getAllArticle();

    public int updateArticle(String title, int id);

    public int deleteArticleById(int id);
}
2
3
4
5
6
7
8
9
10
11
12
13
14
15
16
17
18
19
20
21
22
23
# 创建articleMapper.xml
在resources.mapper下新建一个articleMapper.xml
<?xml version="1.0" encoding="UTF-8" ?>
<!DOCTYPE mapper
        PUBLIC "-//mybatis.org//DTD Mapper 3.0//EN"
        "http://mybatis.org/dtd/mybatis-3-mapper.dtd">
<mapper namespace="com.moyundong.springboottest01.dao.ArticleMapper">
    <insert id="insertArticle">
        insert into tb_article (title,summary,user_id,create_time,public_time,update_time,status, `type`)
        values (#{title}, #{summary}, #{user_id}, #{create_time}, #{public_time}, #{update_time}, #{status}, #{type})
    </insert>
    <update id="updateArticle">
        UPDATE tb_article set title=#{title} WHERE id=#{id}
    </update>
    <delete id="deleteArticleById">
        delete from tb_article where id=#{id}
    </delete>

    <select id="getAllArticle" resultType="com.moyundong.springboottest01.entity.Article">
        select * from tb_article
    </select>
</mapper>
2
3
4
5
6
7
8
9
10
11
12
13
14
15
16
17
18
19
20
# 创建service接口
在包com.moyundong.springboottest01.service下创建service接口ArticleSerice。
package com.moyundong.springboottest01.service;

import com.moyundong.springboottest01.entity.Article;
import com.moyundong.springboottest01.util.ResMsg;

public interface AticleService {
    ResMsg insertArticle(Article article);

    ResMsg getAllArticle();

    ResMsg updateArticle(String title, int id);

    ResMsg deleteArticleById(int id);
}
2
3
4
5
6
7
8
9
10
11
12
13
14
# 创建service实现类
在包com.moyundong.springboottest01.service.impl下创建service接口实现类ArticleSericeImpl。
- 实现AticleService接口中insertArticle的方法
public ResMsg insertArticle(Article article) {
    ResMsg resMsg = new ResMsg();

    if (article != null) {
        int a = articleDao.insertArticle(article);
        if (a > 0) {
            resMsg.setCodeMessage(1, "添加成功");
        } else {
            resMsg.setCodeMessage(-1, "添加失败");
        }
        return resMsg;
    } else {
        resMsg.setCodeMessage(-1, "添加失败");
        return resMsg;
    }
}
2
3
4
5
6
7
8
9
10
11
12
13
14
15
16
- 实现AticleService接口中getAllArticle的方法
public ResMsg getAllArticle() {
    ResMsg resMsg = new ResMsg();

    List list = articleDao.getAllArticle();
    if (list != null) {
        resMsg.setCode(1);
        resMsg.setMessage("查询成功");
        resMsg.addData("list", list);

    } else {
        resMsg.setCodeMessage(-1, "查询错误");
    }
    return resMsg;
}
2
3
4
5
6
7
8
9
10
11
12
13
14
- 实现AticleService接口中updateArticle的方法
public ResMsg updateArticle(String title, int id) {
    ResMsg resMsg = new ResMsg();
    if (title != null && id > 0) {
        int a = articleDao.updateArticle(title, id);
        if (a == -1) {
            resMsg.setCodeMessage(-1, "查询错误");
        } else {
            resMsg.setCodeMessage(1, "修改成功");
        }
    }

    return resMsg;
}
2
3
4
5
6
7
8
9
10
11
12
13
- 实现AticleService接口中deleteArticleById的方法
public ResMsg deleteArticleById(int id) {
    ResMsg resMsg = new ResMsg(1);

    if (id > 0) {
        int result = articleDao.deleteArticleById(id);
        if (result == 1) {
            resMsg.setCodeMessage(1, "删除成功");
            return resMsg;
        }
    }

    resMsg.setCodeMessage(-1, "删除成功");
    return resMsg;
}
2
3
4
5
6
7
8
9
10
11
12
13
14
查看完整ArticleServiceImpl代码
package com.moyundong.springboottest01.service.impl;

import com.moyundong.springboottest01.dao.ArticleDao;
import com.moyundong.springboottest01.service.AticleService;
import com.moyundong.springboottest01.entity.Article;
import com.moyundong.springboottest01.util.ResMsg;
import org.springframework.stereotype.Service;

import javax.annotation.Resource;
import java.util.List;
import java.util.concurrent.locks.ReentrantReadWriteLock;

@Service
public class ArticleServiceImpl implements AticleService {
    @Resource
    ArticleDao articleDao;

    @Override
    public Long insertArticle(Article article) {
        if (article != null) {
            articleDao.insertArticle(article);
            return 1L;
        } else {
            return -1L;
        }
    }

    @Override
    public ResMsg getAllArticle() {
        ResMsg resMsg = new ResMsg();

        List list = articleDao.getAllArticle();
        if (list != null) {
            resMsg.setCode(1);
            resMsg.setMessage("查询成功");
            resMsg.addData("list", list);

        } else {
            resMsg.setCodeMessage(-1, "查询错误");
        }
        return resMsg;
    }

    @Override
    public ResMsg updateArticle(String title, int id) {
        ResMsg resMsg = new ResMsg();
        if (title != null && id > 0) {
            int a = articleDao.updateArticle(title, id);
            if (a == -1) {
                resMsg.setCodeMessage(-1, "查询错误");
            } else {
                resMsg.setCodeMessage(1, "修改成功");
            }
        }

        return resMsg;
    }

    @Override
    public ResMsg deleteArticleById(int id) {
        ResMsg resMsg = new ResMsg(1);

        if (id > 0) {
            int result = articleDao.deleteArticleById(id);
            if (result == 1) {
                resMsg.setCodeMessage(1, "删除成功");
                return resMsg;
            }
        }

        resMsg.setCodeMessage(-1, "删除成功");
        return resMsg;
    }
}
2
3
4
5
6
7
8
9
10
11
12
13
14
15
16
17
18
19
20
21
22
23
24
25
26
27
28
29
30
31
32
33
34
35
36
37
38
39
40
41
42
43
44
45
46
47
48
49
50
51
52
53
54
55
56
57
58
59
60
61
62
63
64
65
66
67
68
69
70
71
72
73
74
75
# 创建controller
在包com.moyundong.springboottest01.controller下创建类ArticleController。
package com.moyundong.springboottest01.controller;

import com.moyundong.springboottest01.entity.Article;
import com.moyundong.springboottest01.service.impl.ArticleServiceImpl;
import com.moyundong.springboottest01.util.ResMsg;
import io.swagger.annotations.Api;
import io.swagger.annotations.ApiOperation;
import org.springframework.beans.factory.annotation.Autowired;
import org.springframework.stereotype.Controller;
import org.springframework.web.bind.annotation.RequestMapping;
import org.springframework.web.bind.annotation.RequestParam;
import org.springframework.web.bind.annotation.RestController;

import java.util.List;

@Api(tags = "用户api详情")
@RestController
public class ArticleController {
    @Autowired
    private ArticleServiceImpl articleService;

    @RequestMapping(value = "/insertArticle")
    @ApiOperation(value = "插入数据",notes = "插入一条新数据")
    public ResMsg insertArticle (@RequestBody Article article) {
        return articleService.insertArticle(article);
    }

    @RequestMapping(value = "/getAll")
    @ApiOperation(value = "用户查询",notes = "获取所有的用户")
    public ResMsg getAllArticle () {
        return articleService.getAllArticle();
    }

    @RequestMapping(value = "/updateTitle")
    @ApiOperation(value = "修改数据",notes = "修改title")
    public ResMsg updateTitle (@RequestParam String title, @RequestParam int id) {
        return articleService.updateArticle(title, id);
    }

    @RequestMapping(value = "/deleteById")
    @ApiOperation(value = "删除数据",notes = "通过ID删除")
    public ResMsg deleteById (@RequestParam int id) {
        return articleService.deleteArticleById(id);
    }
}
2
3
4
5
6
7
8
9
10
11
12
13
14
15
16
17
18
19
20
21
22
23
24
25
26
27
28
29
30
31
32
33
34
35
36
37
38
39
40
41
42
43
44
45
# 创建启动类
在包com.moyundong.springboottest01下创建启动类SpringbootTest01Application。
package com.moyundong.springboottest01;

import oracle.jrockit.jfr.events.ValueDescriptor;
import org.mybatis.spring.annotation.MapperScan;
import org.springframework.boot.SpringApplication;
import org.springframework.boot.autoconfigure.SpringBootApplication;
import org.springframework.boot.autoconfigure.jdbc.DataSourceAutoConfiguration;
import org.springframework.context.annotation.ComponentScan;
import springfox.documentation.swagger2.annotations.EnableSwagger2;

@SpringBootApplication
@MapperScan("com.moyundong.springboottest01.dao")
@ComponentScan(value = {"com"})
@EnableSwagger2
public class SpringbootTest01Application {

    public static void main(String[] args) {
        SpringApplication.run(SpringbootTest01Application.class, args);
    }

}
2
3
4
5
6
7
8
9
10
11
12
13
14
15
16
17
18
19
20
21
# 创建返回结果类
在包com.moyundong.springboottest01.util下创建返回结果类ResMsg。
查看ResMsg完整代码
package com.moyundong.springboottest01.util;

import io.swagger.annotations.ApiModelProperty;
import org.springframework.lang.NonNull;

import java.io.Serializable;
import java.util.Collections;
import java.util.HashMap;
import java.util.List;
import java.util.Map;

/**
 * @Author Xudaoxu
 * @create 2021-07-15 2021/7/15
 */
public class ResMsg<T> implements Serializable {
    private static final long serialVersionUID = -2946579545083632979L;
    @ApiModelProperty(
            value = "成功标识;0:失败;1:成功;2:部分成功;-2:未登录;-3:未权限",
            required = true
    )
    private int code = 0;
    @ApiModelProperty(
            value = "描述信息",
            required = true
    )
    private String message;
    @ApiModelProperty("附加数据")
    private Map data = null;
    private T extData = null;

    public ResMsg() {
    }

    public ResMsg(String errMessage) {
        this.message = errMessage;
    }

    public ResMsg(int code) {
        this.code = code;
    }

    public ResMsg(int code, @NonNull String message) {
        this.code = code;
        this.message = message;
    }

    public ResMsg(int code, Map map) {
        this.code = code;
        this.data = map;
    }

    public ResMsg(int code, List list) {
        this.code = code;
        this.addData("rows", list == null ? Collections.EMPTY_LIST : list);
    }

    public ResMsg(int code, List list, long total) {
        this.code = code;
        this.addData("rows", list == null ? Collections.EMPTY_LIST : list);
        this.addData("total", total);
    }

    public ResMsg(int code, @NonNull String message, Map map) {
        this.code = code;
        this.message = message;
        this.data = map;
    }

    public void addMessage(@NonNull String message) {
        if (this.message != null) {
            this.message = this.message + "\n";
        }

        this.message = this.message + message;
    }

    public void setCodeMessage(int code, @NonNull String message) {
        this.code = code;
        this.message = message;
    }

    public boolean isSuccess() {
        return 1 == this.code;
    }

    public int getCode() {
        return this.code;
    }

    public void setCode(int code) {
        this.code = code;
    }

    public String getMessage() {
        return this.message;
    }

    public void setMessage(String message) {
        this.message = message;
    }

    public Map getData() {
        return this.data;
    }

    public <T> T getDataItem(String key) {
        return this.data == null ? null : (T) this.data.get(key);
    }

    public void setData(Map data) {
        this.data = data;
    }

    public void addData(@NonNull String key, Object data) {
        if (this.data == null) {
            this.data = new HashMap(2);
        }

        this.data.put(key, data);
    }

    public <T> T removeData(@NonNull String key) {
        return this.data != null ? (T) this.data.remove(key) : null;
    }

    public void setRows(List list) {
        this.addData("rows", list == null ? Collections.EMPTY_LIST : list);
    }

    public void setExtData(T extData) {
        this.extData = extData;
    }
}
2
3
4
5
6
7
8
9
10
11
12
13
14
15
16
17
18
19
20
21
22
23
24
25
26
27
28
29
30
31
32
33
34
35
36
37
38
39
40
41
42
43
44
45
46
47
48
49
50
51
52
53
54
55
56
57
58
59
60
61
62
63
64
65
66
67
68
69
70
71
72
73
74
75
76
77
78
79
80
81
82
83
84
85
86
87
88
89
90
91
92
93
94
95
96
97
98
99
100
101
102
103
104
105
106
107
108
109
110
111
112
113
114
115
116
117
118
119
120
121
122
123
124
125
126
127
128
129
130
131
132
133
134
# 测试
在浏览器中输入http://localhost:8081/swagger-ui.html进入swagger界面进行测试
提示
如果不会swagger,请查看springboot集成swagger
# 项目相关目录
# springboot集成swagger
# swagger的介绍
- Restful Api 文档在线自动生成器 => API 文档 与API 定义同步更新
- 直接运行,在线测试API
- 支持多种语言 (如:Java,PHP等)
# 配置swagger依赖
<!-- https://mvnrepository.com/artifact/io.springfox/springfox-swagger2 -->
<dependency>
   <groupId>io.springfox</groupId>
   <artifactId>springfox-swagger2</artifactId>
   <version>2.9.2</version>
</dependency>
<!-- https://mvnrepository.com/artifact/io.springfox/springfox-swagger-ui -->
<dependency>
   <groupId>io.springfox</groupId>
   <artifactId>springfox-swagger-ui</artifactId>
   <version>2.9.2</version>
</dependency>
2
3
4
5
6
7
8
9
10
11
12
# 创建SwaggerConfig类配置Swagger
@Configuration //配置类
@EnableSwagger2// 开启Swagger2的自动配置
public class SwaggerConfig {
}
2
3
4
# Swagger注解
| Swagger注解 | 简单说明 |
|---|---|
| @Api(tags = “xxx模块说明”) | 作用在模块类上 |
| @ApiOperation(“xxx接口说明”) | 作用在接口方法上 |
| @ApiModel(“xxxPOJO说明”) | 作用在模型类上:如VO、BO |
| @ApiModelProperty(value = “xxx属性说明”,hidden = true) | 作用在类方法和属性上,hidden设置为true可以隐藏该属性 |
| @ApiParam(“xxx参数说明”) | 作用在参数、方法和字段上,类似@ApiModelProperty |
# swagger示例
- 选择请求类型
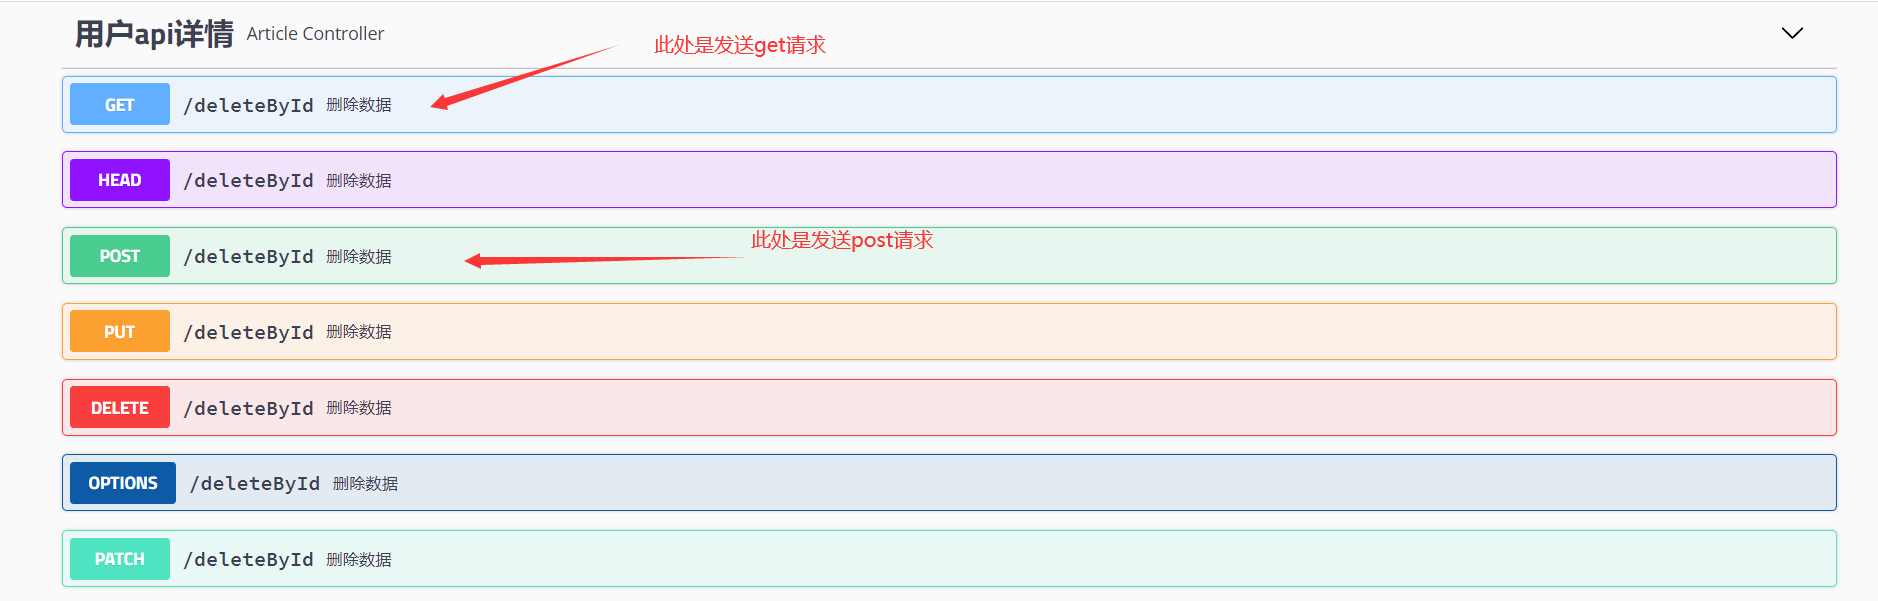
- 查看发送参数的类型、字段、信息
- 确认发送信息,点击Execute

提示
这里只讲了Get、Post请求,其他内容请自行学习。
# springboot集成lombok
# lombok的作用
- 自动生成实体Bean中的Getter/Setter方法
- 自动生成构造器、toString、hashCode等可能不会用到,但是某些时候仍然需要复写,以便后期使用这些方法
- 在运行过程中自动生成的,代码里面就不包含get、set等方法,将极大减少代码总量
注意
在运行过程中,lombok会自动生成的相应的方法,将极大减少你的代码总量。
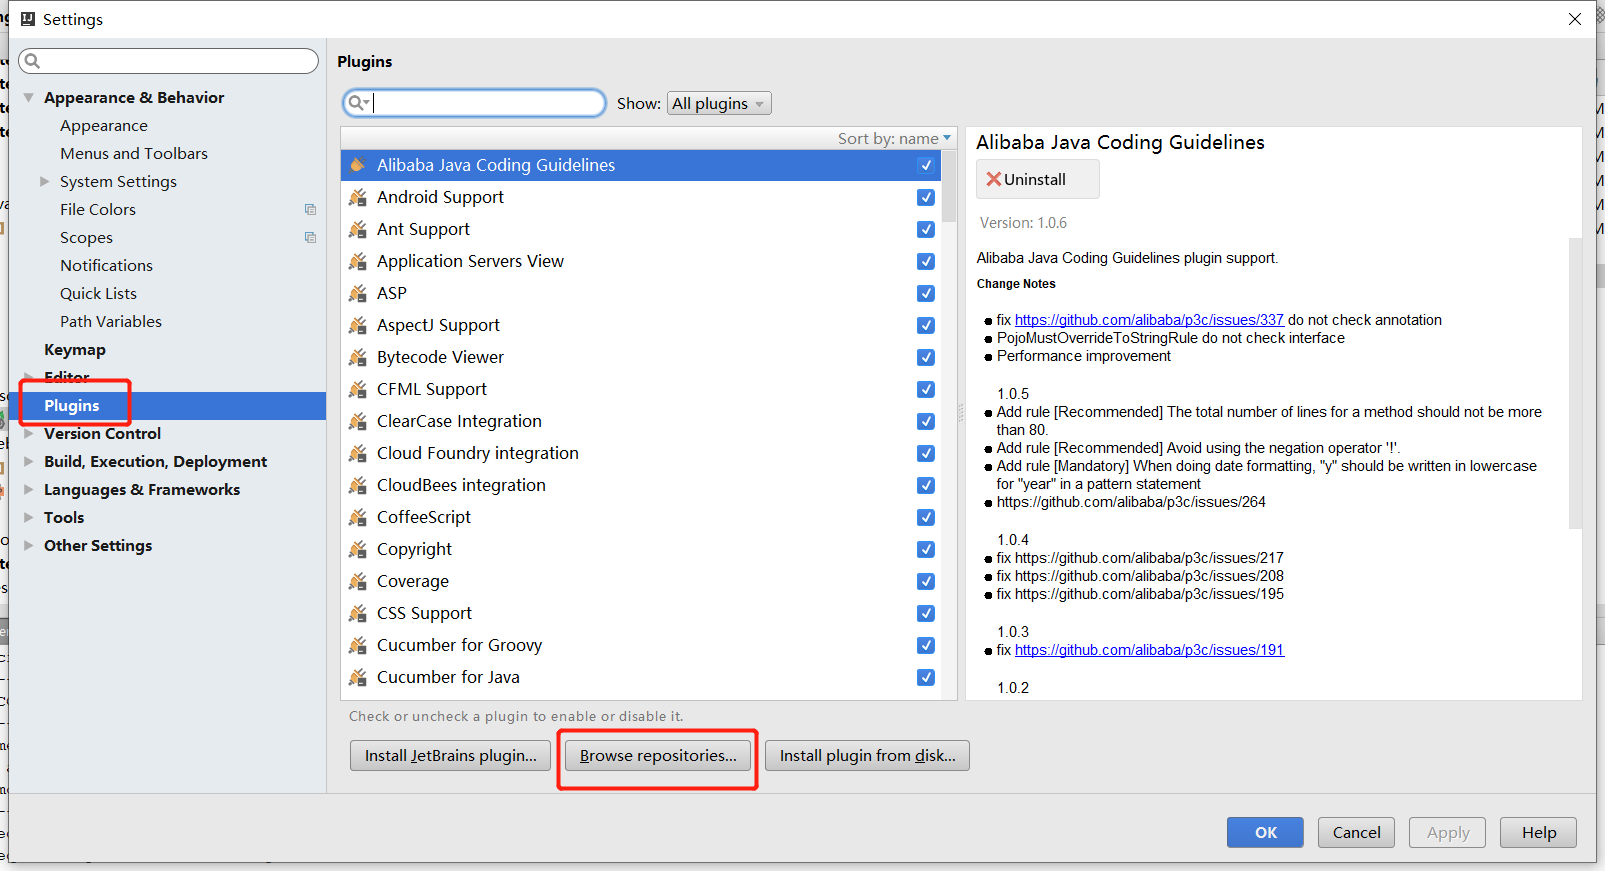
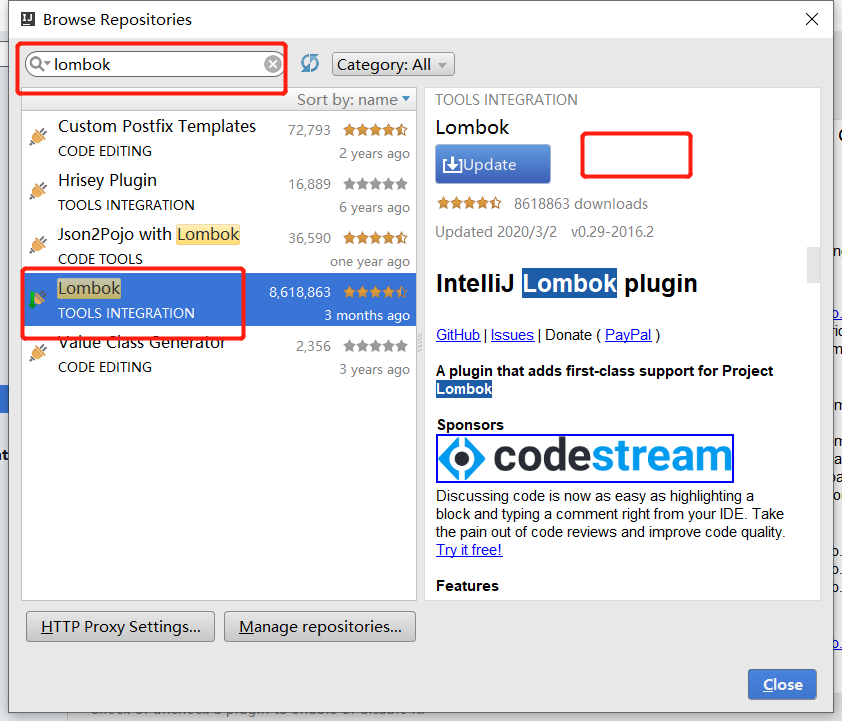
# idea安装lombok插件
- 在idea的settings下找到plugins菜单,点击Browse repositories
- 然后搜索lombok,点击右侧下载,下载完成重启即可(我的idea已经安装过了,所以显示的是update)
# 添加lombok依赖
在pom里面添加lombok依赖
<!--代码简化工具-->
    <dependency>
      <groupId>org.projectlombok</groupId>
      <artifactId>lombok</artifactId>
    </dependency>
2
3
4
5
提示
这里无需指定版本,因为Spring Boot中已经默认引入了这个类库,且指定了其scope,当然,你手动指定版本也是没问题的。
# lombok常用注解及原理
- @Data:注解在类上,包含了@ToString,@EqualsAndHashCode,@Getter / @Setter和@RequiredArgsConstructor的功能,提供类所有属性的 getter 和 setter 方法, 此外还提供了equals、canEqual、hashCode、toString 方法。这个是最常用的注解,与dao对应的实体类上加这个很方便,代码也很简洁。
- @Slf4j :注解在类上,根据用户实际使用的日志框架生成log日志对象。springboot默认集成了logback日志,加上这个注解就可以在类里面使用log对象打印日志了。
- @Setter:注解在属性上,为一个属性提供 setter 方法
- @Getter:注解在属性上,为一个属性提供 getter 方法
- @ToString:注解在类上,生成toString()方法,默认情况下,它会按顺序(以逗号分隔)打印你的类名称以及每个字段。可以这样设置不包含哪些 字段@ToString(exclude = "id") / @ToString(exclude = {"id","name"})如果继承的有父类的话,可以设置callSuper 让其调用父类的toString()方法,例如:@ToString(callSuper = true)
- @EqualsAndHashCode:注解在类上,生成hashCode()和equals()方法,默认情况下,它将使用所有非静态,非transient字段。但可以通过在可选的exclude参数中来排除更多字段。或者,通过在parameter参数中命名它们来准确指定希望使用哪些字段。
- @NonNull: 注解在属性上,标识属性是不能为空,为空则抛出异常(NullPointerException)。
- @CleanUp : 自动资源管理,不用再在finally中添加资源的close方法 ,用在局部变量之前,在当前变量范围内即将执行完毕退出之前会自动清理资源,自动生成try-finally这样的代码来关闭流。
- @NoArgsConstructor : 用在类上,自动生成无参构造函数。
- @RequiredArgsConstructor : 用在类上,自动生成所有参构造函数。
- @AllArgsConstructor : 用在类上,自动生成把所有@NonNull属性作为参数的构造函数。
- @Value:用在类上,相当于为属性添加final声明,只提供getter方法,而不提供setter方法。
# lombok示例
@Data注解 在实体类SysUser中的使用
@Data
public class SysUser {
    private String id;
    private String username;
    private String password;
    private Date birthday;
    private String email;
}
2
3
4
5
6
7
8
@Slf4j注解在TestController类中使用。由于在SysUser中使用@Data注解没有get、set、toString等方法,但是在TestController类中创建的SysUser对象,可以使用上述方法。
@RestController
@RequestMapping("/Test")
@Slf4j
public class TestController {
    @RequestMapping("/lombok")
    public Object hello(){
        log.info("这个log对象是由@Slf4j自动生成的。");
        // 创建一个SysUser对象
        SysUser sysUser = new SysUser();
        // 使用set方法设置属性:虽然类里面没有明确写set方法,但是我们可以调用
        sysUser.setId("id10001");
        sysUser.setBirthday(new Date());
        sysUser.setEmail("aa@aa.com");
        sysUser.setPassword("111");
        sysUser.setUsername("lombok");
        // 使用get方法获取属性
        log.info(sysUser.getUsername());
        // 使用toString方法
        log.info(sysUser.toString());
        return sysUser;
    }
}
2
3
4
5
6
7
8
9
10
11
12
13
14
15
16
17
18
19
20
21
22
提示
- 在 Bean 或者 Entity 类上使用
@Data注解 - 需要打印日志的类使用
@Slf4j注解 - lombok还有很多其它用法,大家可以看注解的解释自行练习,有需要了再用。
# 测试
启动项目,在浏览器输入http://localhost:8088/moyundong/Test/lombok可以查看对应效果。
# springboot集成mybatis
springboot集成mybatis的步骤简单,具体做法如下:
# 添加依赖
在pom文件中添加项目springboot-test04的相关依赖项目目录结构
- mybatis支持:mybatis-spring-boot-starter包含所有的springboot和mybatis依赖
- druid支持:阿里数据库连接池
- lombook支持:主要是简化代码用
- mysql驱动:数据库我们使用mysql,所以加上mysql的驱动
<!-- 添加mybatis依赖 -->
    <dependency>
      <groupId>org.mybatis.spring.boot</groupId>
      <artifactId>mybatis-spring-boot-starter</artifactId>
      <version>1.3.5</version>
    </dependency>
    <!--添加mysql驱动-->
    <dependency>
      <groupId>mysql</groupId>
      <artifactId>mysql-connector-java</artifactId>
      <version>5.1.47</version>
      <scope>runtime</scope>
    </dependency>
    <!--添加数据库连接池 -->
    <dependency>
      <groupId>com.alibaba</groupId>
      <artifactId>druid-spring-boot-starter</artifactId>
      <version>1.1.16</version>
    </dependency>

    <!--代码简化工具-->
    <dependency>
      <groupId>org.projectlombok</groupId>
      <artifactId>lombok</artifactId>
      <version>1.18.8</version>
      <scope>provided</scope>
    </dependency>
  </dependencies>
2
3
4
5
6
7
8
9
10
11
12
13
14
15
16
17
18
19
20
21
22
23
24
25
26
27
28
# 相关配置
在application.yml配置中配置mybatis相关属性、配置数据源相关属性、配置mapper文件路径和配置mapper别名
server:
  port: 8089 # 配置端口
  servlet:
      context-path: /moyundong # 配置项目名称
# 配置数据源
spring:
  datasource:
    type: com.alibaba.druid.pool.DruidDataSource
    driver-class-name: com.mysql.jdbc.Driver
    url: jdbc:mysql://127.0.0.1:3306/springbootdata
    username: root
    password: root
# 配置mybatis
mybatis:
  mapper-locations: classpath:com/mapper/*.xml # mybatis的路径,我们放到resources下的com/mapper文件夹下面
  type-aliases-package: com.moyundong.entity # 默认别名就是实体类名,或者类名首字母小写 SysUser | sysUser
2
3
4
5
6
7
8
9
10
11
12
13
14
15
16
# 创建数据库表
- 创建springbootdata的数据库
注意
注意与数据用配置的名称一样就可以了。
- 创建SysUser表
CREATE TABLE `sys_user` (
  `id` varchar(64) NOT NULL COMMENT '主键id',
  `username` varchar(100) DEFAULT NULL COMMENT '登录账号',
  `password` varchar(255) DEFAULT NULL COMMENT '密码',
  `birthday` datetime DEFAULT NULL COMMENT '生日',
  `email` varchar(100) DEFAULT NULL COMMENT '电子邮件',
  PRIMARY KEY (`id`)
) ENGINE=InnoDB DEFAULT CHARSET=utf8 COMMENT='用户表';
2
3
4
5
6
7
8
# 创建实体类
在com.moyundong.entity包下创建SysUser实体类,该实体类与数据库表sys_user是对应的。
由于数据库表名sys_user的首字母大写,去掉 下划线,并且下划线后面的首字母也要大写,因此sys_user表对应的实体类就是SysUser了。
@Data
public class SysUser {
    private String id;
    private String username;
    private String password;
    private Date birthday;
    private String email;
}
2
3
4
5
6
7
8
:: tip 提示 因为我们使用了lombok的注解@Data,实体类里面get和set方法,注解@Data会自动帮我们生成get和set方法。 :::
# 创建dao接口
- 在
com.moyundong.dao目录下创建相关dao类,首先我们创建一个BaseDao类,里面用于写公共方法。
public interface BaseDao<T> {
    void save(T t);
    List<T> findAll();
}
2
3
4
- 由于创建我们的
SysUserDao类继承了BaseDao类,因此在就不用再写save和findAll方法了。其他dao类也可以继承BaseDao类。
public interface SysUserDao extends BaseDao<SysUser> {
}
2
# 创建mapper配置文件
在resources.com.mapper目录下创建SysUserMapper.xml文件,定义了save和findAll两个方法,内容如下:
<?xml version="1.0" encoding="UTF-8"?>
<!DOCTYPE mapper PUBLIC "-//mybatis.org//DTD Mapper 3.0//EN" "http://mybatis.org/dtd/mybatis-3-mapper.dtd">
<mapper namespace="com.moyundong.dao.SysUserDao">
    <insert id="save" parameterType="sysUser">
        INSERT INTO sys_user VALUES (#{id},#{username},#{password},#{birthday},#{email})
    </insert>

    <select id="findAll" resultType="SysUser">
        SELECT id,username,password,birthday,email from sys_user
    </select>
</mapper>
2
3
4
5
6
7
8
9
10
11
提示
- namespace="com.moyundong.dao.SysUserDao" 指向的是我们的dao文件
- parameterType和resultType使用的是sysUser和SysUser,首字母大写和小写都是可以的,也就验证了我们在mybatis配置type-aliases-package( 自动配置别名 )的说法。
# 创建service接口
在com.moyundong.service包下创建SysUserService接口
public interface SysUserService {
    void save(SysUser sysUser);
    List<SysUser> findAll();
}
2
3
4
# 创建service实现类
在com.moyundong.service包下创建SysUserServiceImpl类,实现了SysUserService接口,并且注入了sysUserDao实例
@Service
@Transactional
public class SysUserServiceImpl implements SysUserService {

    @Autowired
    private SysUserDao sysUserDao;

    @Override
    public void save(SysUser sysUser) {
        sysUser.setId(UUID.randomUUID().toString());
        sysUserDao.save(sysUser);
    }

    @Override
    public List<SysUser> findAll() {
        return sysUserDao.findAll();
    }
}
2
3
4
5
6
7
8
9
10
11
12
13
14
15
16
17
18
提示
- 使用@Transactional注解开启了事务
- 使用@Service注解表名该类是一个service,并且把他实例化了,不用再加component
# 创建controller
在com.moyundong.controller包下创建SysUserController类。该类中save和findAll两个方法,并且注入了sysUserService实例 。
@RestController
@RequestMapping("sysUser")
public class SysUserController {

    @Autowired
    private SysUserService sysUserService;

    @RequestMapping("save")
    public String save(SysUser sysUser){
        sysUserService.save(sysUser);
        return "添加成功";
    }
    @RequestMapping("findAll")
    public Object findAll(){
        return sysUserService.findAll();
    }
}
2
3
4
5
6
7
8
9
10
11
12
13
14
15
16
17
提示
我们的controller都使用了@RestController注解,表明返回的数据格式是json。@RestController不可用写jsp页面,但是现在大部分项目都是前后台分离。因此现在前后端都是通过json传递数据的,后台只关心接口实现,不用关心前台页面。
# 启动类中扫描dao
入口类Test04Application加上@MapperScan("com.moyundong.dao")注解来扫描dao包
@SpringBootApplication
@MapperScan("com.moyundong.dao")
public class Test04Application extends SpringBootServletInitializer {
    public static void main(String[] args) throws UnknownHostException {
        SpringApplication.run(Test04Application.class, args);
    }
}
2
3
4
5
6
7
# 测试
启动Test04Application运行项目。
- 在浏览器输入
http://localhost:8089/moyundong/sysUser/save?username=water2&password=111&birthday=2019/01/09&email=abc@cc.com来新增数据 - 在浏览器输入
http://localhost:8089/moyundong/sysUser/findAll来查询数据
注意
为了演示方便,两个方法都用了get请求方式,实际应用中,save应该是post请求方式。
本节项目目录结构如下:
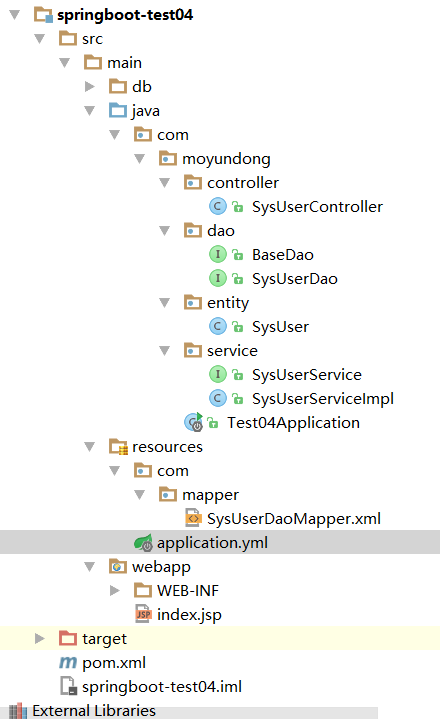
# springboot集成logback日志
# logback介绍
Logback是由log4j创始人设计的开源日志组件。logback分成三个模块:logback-core,logback- classic和l ogback-access。logback-core是其它两个模块的基础模块。logback-classic是log4j的一个改良版本。 此外logback-classic完整实现SLF4J API。因此你可以很方便地更换成其它日志系统如log4j或JDK14 Logging。 logback-access访问模块为Servlet容器提供通过Http来访问日志的功能。
提示
这一节的示例是在第五节springboot集成mybatis (opens new window)的基础上加的。
# 日志级别
ALL > DEBUG > INFO > WARN > ERROR > OFF 级别越低,输出日志越多。ALL是所有都输出,OFF是都不输出。
- ALL:所有都输出
- DEBUG:输出DEBUG及后面所有日志
- INFO:输出INFO及后面所有日志
- WARN:输出WARN及后面所有日志
- ERROR:只输出ERROR级别日志
# 日志分类
- 项目根日志:全局日志,一个项目只有一个根日志
- 项目子日志:包级别的日志,一个项目可以有多个子日志。
没有特别指明的地方都用的是根日志规则,如果有子日志的情况,都会给子日志制定规则。
# 在application.yml中配置logback
在application.yml中配置日志级别和日志文件保存路径,配置方法如下:
logging:
  level:
    root: info # 根日志,默认级别是info,如果使用info,可以不写这一行
    com.moyundong.dao: debug # 子级别日志,可以指定到自己的某个包
  file: d:/log/springboot-test04.log # 定义日志文件的路径,可以是相对路径也可以是绝对路径
2
3
4
5
效果图如下图:
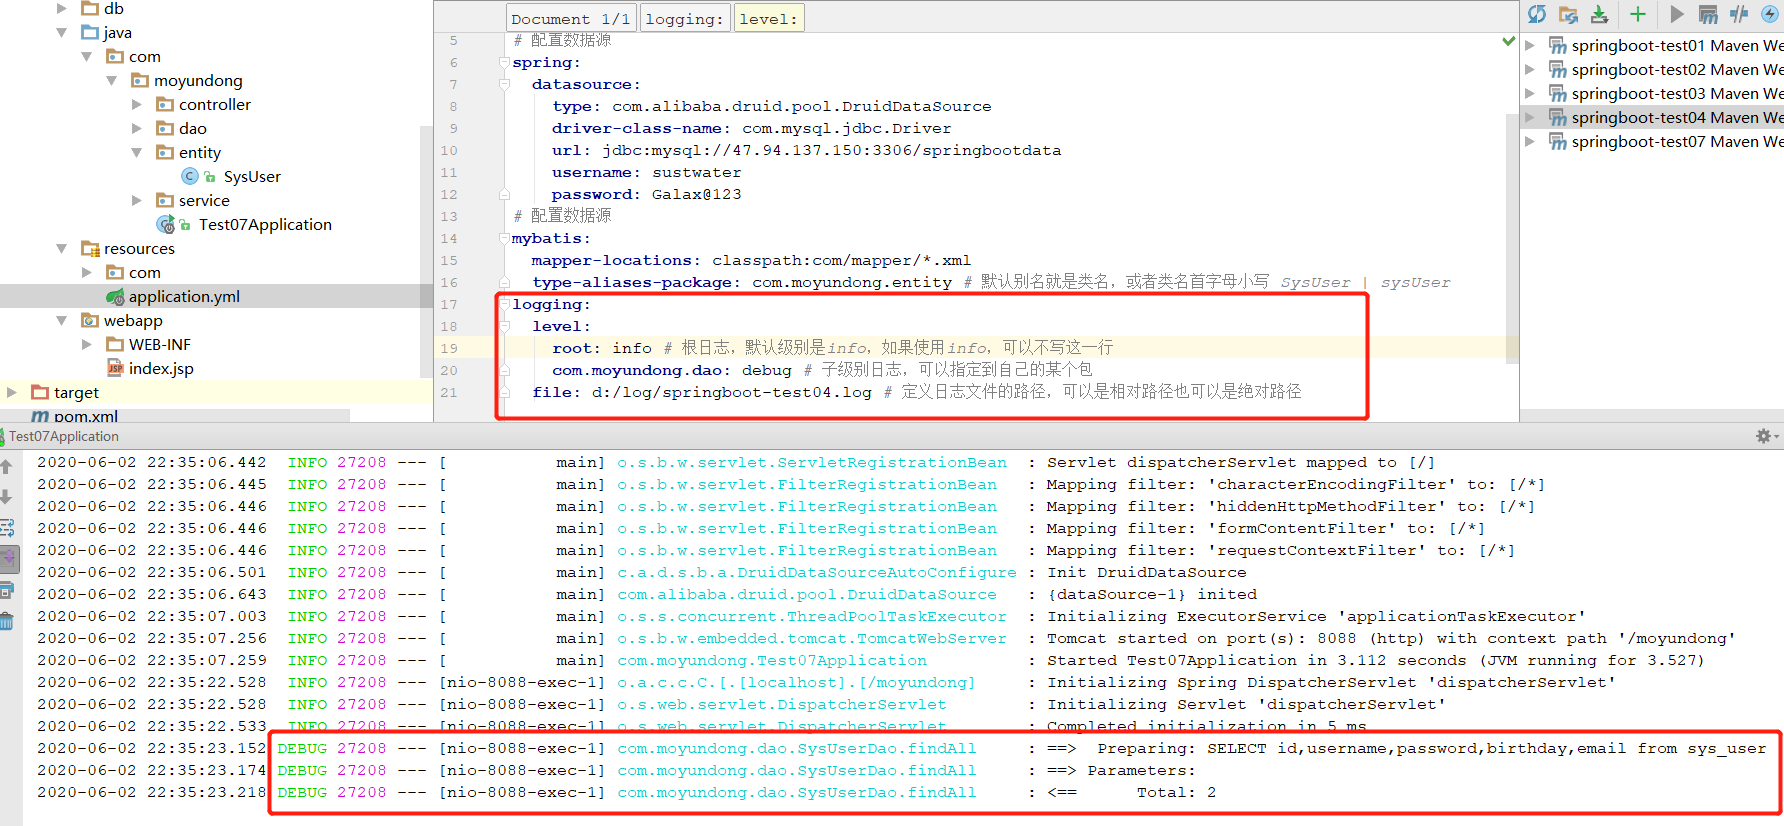
默认的日志文件能存储10MB内容,当文件大于10MB就会生成一个压缩文件,然后重新生成一个文件继续记录,压缩文件中会保存以前的日志信息。
# 自定义logback-spring.xml文件
如果想定义日志级别、输出格式、备份日志策略等等,我们就在src/main/resource下面要创建logback-spring.xml文件进行自定义配置。
查看logback-spring.xml配置信息
<?xml version="1.0" encoding="UTF-8"?>
<configuration debug="false">
	<!--定义日志文件的存储地址目录 -->
	<property name="LOG_HOME" value="D:/log/springboot-test07" />

	<!-- 控制台输出的配置 -->
	<appender name="STDOUT"
		class="ch.qos.logback.core.ConsoleAppender">
		<encoder
			class="ch.qos.logback.classic.encoder.PatternLayoutEncoder">
			<!--格式化输出:%d表示日期,%thread表示线程名,%-5level:级别从左显示5个字符宽度%msg:日志消息,%n是换行符 -->
			<pattern>%d{yyyy-MM-dd HH:mm:ss.SSS} [%thread] %-5level %logger{50}:%L - %msg%n</pattern>
		</encoder>
	</appender>

	<!-- 每天生成一个.log日志文件 -->
	<appender name="FILE" class="ch.qos.logback.core.rolling.RollingFileAppender">
		<rollingPolicy class="ch.qos.logback.core.rolling.TimeBasedRollingPolicy">
			<!--日志文件输出的文件名,我们使用的是路径${LOG_HOME}+文件名(文件名里面加了日期) -->
			<FileNamePattern>${LOG_HOME}/test07.%d{yyyy-MM-dd}.log</FileNamePattern>
			<!--日志文件保留天数 -->
			<MaxHistory>30</MaxHistory>
		</rollingPolicy>
		<encoder class="ch.qos.logback.classic.encoder.PatternLayoutEncoder">
			<!--格式化输出:%d表示日期,%thread表示线程名,%-5level:级别从左显示5个字符宽度%msg:日志消息,%n是换行符 -->
			<pattern>%d{yyyy-MM-dd HH:mm:ss.SSS} [%thread] %-5level %logger{50}:%L - %msg%n</pattern>
		</encoder>
		<!--日志文件最大的大小,默认是10MB,超过这个就会备份为一个压缩文件 -->
		<triggeringPolicy class="ch.qos.logback.core.rolling.SizeBasedTriggeringPolicy">
			<MaxFileSize>10MB</MaxFileSize>
		</triggeringPolicy>
	</appender>

	<!-- 每天生成一个html格式的日志 -->
	<appender name="HtmlFile" class="ch.qos.logback.core.rolling.RollingFileAppender">
		<rollingPolicy class="ch.qos.logback.core.rolling.TimeBasedRollingPolicy">
			<!--日志文件输出的文件名 -->
			<FileNamePattern>${LOG_HOME}/test07.%d{yyyy-MM-dd}.html</FileNamePattern>
			<!--日志文件保留天数 -->
			<MaxHistory>30</MaxHistory>
		</rollingPolicy>
		<encoder class="ch.qos.logback.core.encoder.LayoutWrappingEncoder">
			<layout class="ch.qos.logback.classic.html.HTMLLayout">
				<pattern>%p%d%msg%M%F{32}%L</pattern>
			</layout>
		</encoder>
		<!--日志文件最大的大小 -->
		<triggeringPolicy class="ch.qos.logback.core.rolling.SizeBasedTriggeringPolicy">
			<MaxFileSize>10MB</MaxFileSize>
		</triggeringPolicy>
	</appender>

	<!-- 生成html格式的WARN级别日志 -->
	<appender name="WARNHtmlFile" class="ch.qos.logback.core.FileAppender">
		<!-- 过滤器,只记录WARN级别的日志 -->
		<filter class="ch.qos.logback.classic.filter.LevelFilter">
			<level>WARN</level>
			<onMatch>ACCEPT</onMatch>
			<onMismatch>DENY</onMismatch>
		</filter>

		<encoder class="ch.qos.logback.core.encoder.LayoutWrappingEncoder">
			<layout class="ch.qos.logback.classic.html.HTMLLayout">
				<pattern>%p%d%msg%M%F{32}%L</pattern>
			</layout>
		</encoder>
		<file>${LOG_HOME}/WARN-log.html</file>
	</appender>

	<!-- 根日志输出级别 -->
	<root level="INFO">
		<appender-ref ref="STDOUT" />
		<appender-ref ref="FILE" />
		<appender-ref ref="HtmlFile" />
	</root>

	<!--自定义日志级别配置,指定我们项目都是debug级别 -->
	<logger name="com.moyundong" level="debug" />

</configuration>
2
3
4
5
6
7
8
9
10
11
12
13
14
15
16
17
18
19
20
21
22
23
24
25
26
27
28
29
30
31
32
33
34
35
36
37
38
39
40
41
42
43
44
45
46
47
48
49
50
51
52
53
54
55
56
57
58
59
60
61
62
63
64
65
66
67
68
69
70
71
72
73
74
75
76
77
78
79
80
这份配置文件定义了4个不同类型的输出,一个是控制台输出,3个是文件输出。输出级别可以自定义。
# 测试
我在SysUserController的findAll方法里面写了4种不同级别的日志,大家可以运行起来试试。 在浏览器输入http://localhost:8088/moyundong/sysUser/findAll来查询数据,看看打印的日志信息。
@RequestMapping("findAll")
public Object findAll(){
    log.debug("findAll查询debug级别日志信息");
    log.info("findAll查询info级别日志信息");
    log.warn("findAll查询warn级别日志信息");
    log.error("findAll查询error级别日志信息");
    return sysUserService.findAll();
}
2
3
4
5
6
7
8
提示
如果同时配置了application.yml和logback-spring.xml文件,那么以logback-spring.xml文件为准。
# springboot集成Thymeleaf
# 模板引擎的介绍
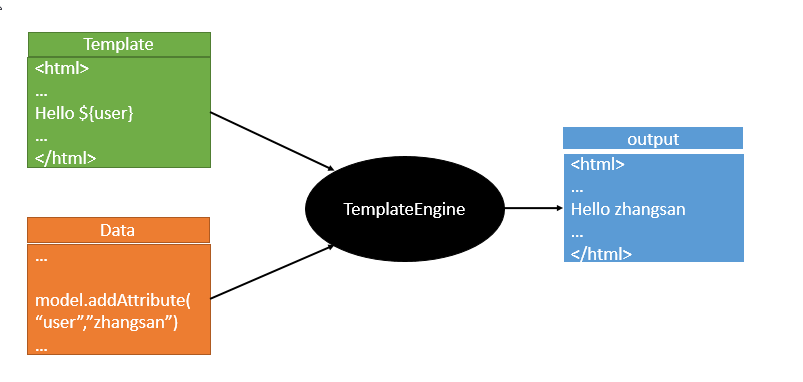
# 添加thymeleaf相关依赖
<dependency>
    <groupId>org.springframework.boot</groupId>
    <artifactId>spring-boot-starter-thymeleaf</artifactId>
    <version>2.1.6</version>
</dependency>
// 切换thymeleaf版本
<properties>
    <thymeleaf.version>3.0.9.RELEASE</thymeleaf.version>
    <!-- 布局功能的支持程序  thymeleaf3主程序  layout2以上版本 -->
    <!-- thymeleaf2   layout1-->
    <thymeleaf-layout-dialect.version>2.2.2</thymeleaf-layout-dialect.version>
</properties>
2
3
4
5
6
7
8
9
10
11
12
# Thymeleaf使用
@ConfigurationProperties(prefix = "spring.thymeleaf")
public class ThymeleafProperties {

	private static final Charset DEFAULT_ENCODING = Charset.forName("UTF-8");

	private static final MimeType DEFAULT_CONTENT_TYPE = MimeType.valueOf("text/html");

	public static final String DEFAULT_PREFIX = "classpath:/templates/";

	public static final String DEFAULT_SUFFIX = ".html";
  	//
}
2
3
4
5
6
7
8
9
10
11
12
当我们把HTML页面放在classpath:/templates/目录下,thymeleaf就能自动渲染; 使用: 1、导入thymeleaf的名称空间
<html lang="en" xmlns:th="http://www.thymeleaf.org">
2、使用thymeleaf语法;
<!DOCTYPE html>
<html lang="en" xmlns:th="http://www.thymeleaf.org">
<head>
    <meta charset="UTF-8">
    <title>Title</title>
</head>
<body>
    <h1>成功!</h1>
    <!--th:text 将div里面的文本内容设置为 -->
    <div th:text="${hello}">这是显示欢迎信息</div>
</body>
</html>
2
3
4
5
6
7
8
9
10
11
12
# 语法规则
- th:text;改变当前元素里面的文本内容;
th:任意html属性;来替换原生属性的值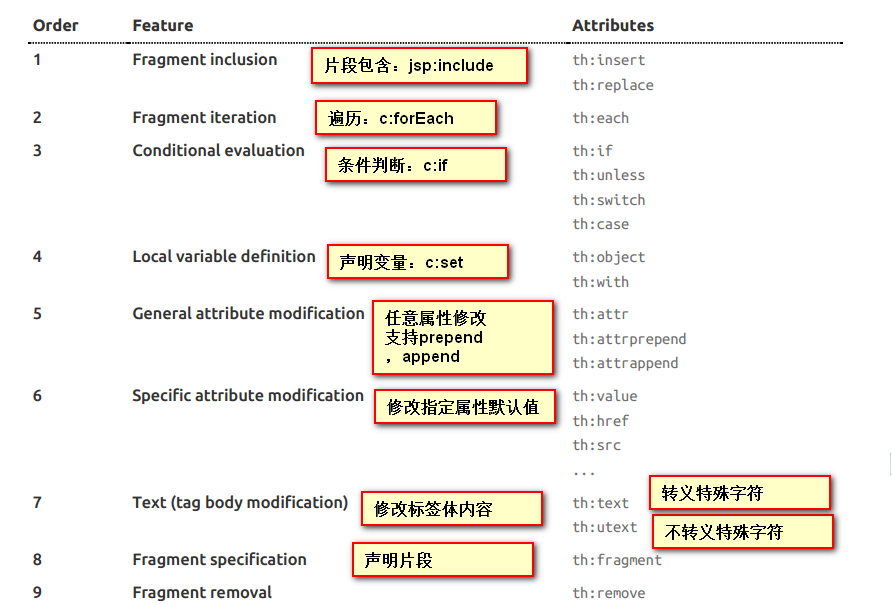
- 表达式
常用表达式
Simple expressions:(表达式语法)
Variable Expressions: ${...}:获取变量值;OGNL;
1)、获取对象的属性、调用方法
2)、使用内置的基本对象:
    #ctx : the context object.
    #vars: the context variables.
    #locale : the context locale.
    #request : (only in Web Contexts) the HttpServletRequest object.
    #response : (only in Web Contexts) the HttpServletResponse object.
    #session : (only in Web Contexts) the HttpSession object.
    #servletContext : (only in Web Contexts) the ServletContext object.

${session.foo}
3)、内置的一些工具对象:
    #execInfo : information about the template being processed.
    #messages : methods for obtaining externalized messages inside variables expressions, in the same way as they would be obtained using #{…} syntax.
    #uris : methods for escaping parts of URLs/URIs
    #conversions : methods for executing the configured conversion service (if any).
    #dates : methods for java.util.Date objects: formatting, component extraction, etc.
    #calendars : analogous to #dates , but for java.util.Calendar objects.
    #numbers : methods for formatting numeric objects.
    #strings : methods for String objects: contains, startsWith, prepending/appending, etc.
    #objects : methods for objects in general.
    #bools : methods for boolean evaluation.
    #arrays : methods for arrays.
    #lists : methods for lists.
    #sets : methods for sets.
    #maps : methods for maps.
    #aggregates : methods for creating aggregates on arrays or collections.
    #ids : methods for dealing with id attributes that might be repeated (for example, as a result of an iteration).

Selection Variable Expressions: *{...}:选择表达式:和${}在功能上是一样;
补充:配合 th:object="${session.user}:
<div th:object="${session.user}">
	<p>Name: <span th:text="*{firstName}">Sebastian</span>.</p>
    <p>Surname: <span th:text="*{lastName}">Pepper</span>.</p>
    <p>Nationality: <span th:text="*{nationality}">Saturn</span>.</p>
</div>

Message Expressions: #{...}:获取国际化内容
Link URL Expressions: @{...}:定义URL;
@{/order/process(execId=${execId},execType='FAST')}
Fragment Expressions: ~{...}:片段引用表达式
<div th:insert="~{commons :: main}">...</div>
Literals(字面量)
Text literals: 'one text' , 'Another one!' ,…
Number literals: 0 , 34 , 3.0 , 12.3 ,…
Boolean literals: true , false
Null literal: null
Literal tokens: one , sometext , main ,…
Text operations:(文本操作)
String concatenation: +
Literal substitutions: |The name is ${name}|
Arithmetic operations:(数学运算)
Binary operators: + , - , * , / , %
Minus sign (unary operator): -
Boolean operations:(布尔运算)
Binary operators: and , or
Boolean negation (unary operator): ! , not
Comparisons and equality:(比较运算)
Comparators: > , < , >= , <= ( gt , lt , ge , le )
Equality operators: == , != ( eq , ne )
Conditional operators:条件运算(三元运算符)
If-then: (if) ? (then)
If-then-else: (if) ? (then) : (else)
Default: (value) ?: (defaultvalue)
Special tokens:
No-Operation: _
2
3
4
5
6
7
8
9
10
11
12
13
14
15
16
17
18
19
20
21
22
23
24
25
26
27
28
29
30
31
32
33
34
35
36
37
38
39
40
41
42
43
44
45
46
47
48
49
50
51
52
53
54
55
56
57
58
59
60
61
62
63
64
65
66
67
68
# 整合SpringData JPA
# SpringData简介
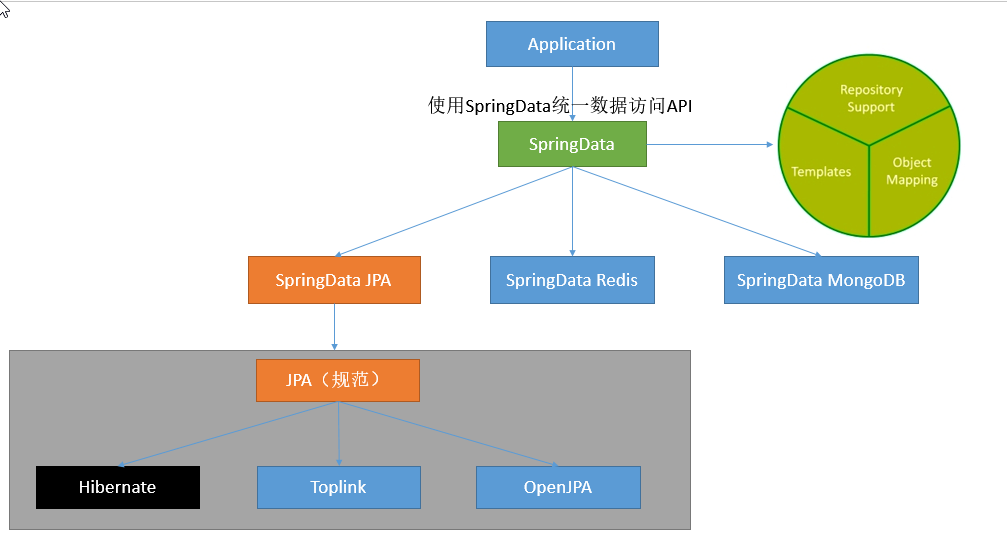
# 添加SpringData JPA相关依赖
<!-- https://mvnrepository.com/artifact/org.springframework.boot/spring-boot-starter-data-jpa -->
<dependency>
    <groupId>org.springframework.boot</groupId>
    <artifactId>spring-boot-starter-data-jpa</artifactId>
    <version>2.5.2</version>
</dependency>
2
3
4
5
6
7
# 整合SpringData JPA
- 编写一个实体类(bean)和数据表进行映射,并且配置好映射关系
//使用JPA注解配置映射关系
@Entity //告诉JPA这是一个实体类(和数据表映射的类)
@Table(name = "tbl_user") //@Table来指定和哪个数据表对应;如果省略默认表名就是user;
public class User {

    @Id //这是一个主键
    @GeneratedValue(strategy = GenerationType.IDENTITY)//自增主键
    private Integer id;

    @Column(name = "last_name",length = 50) //这是和数据表对应的一个列
    private String lastName;
    @Column //省略默认列名就是属性名
    private String email;
}
2
3
4
5
6
7
8
9
10
11
12
13
14
- 编写一个Dao接口来操作实体类对应的数据表(Repository)
//继承JpaRepository来完成对数据库的操作
public interface UserRepository extends JpaRepository<User,Integer> {
}
2
3
- 配置JpaProperties
spring:
 jpa:
    hibernate:
#     更新或者创建数据表结构
      ddl-auto: update
#    控制台显示SQL
    show-sql: true
2
3
4
5
6
7
# springboot面向切面编程
# 什么是面向切面编程
- 全称Aspect Oriented Programming,面向切面编程,简称aop。
- 当很多方法需要经过相同的事情,我们可以把相同的事情单独拎出来写个方法,通过aop方式指定方法去使用这个单独的方法。在项目中操作日志就是通过aop实现的。
# 基本概念
- @Aspect:作用在类上,代表这个类是一个切面配置类
# 通知的方式
- @Before:前置通知,作用在方法上,执行目标方法之前会进入前置通知
- @After:后置通知,作用在方法上,执行目标方法之后会进入后置通知
- @Around:环绕通知,作用在方法上,执行目标方法之前和之后都会进入环绕通知。
# 切入点表达式
3个通知都有value属性,可以自定义切入点表达式,我们主要使用execution和within
- execution:方法级别,精确到每个方法
- within:类级别,精确到类,效率高。如果我们要作用在整个类上,就用within
# 顺序控制
@order:可以用在类上,也可以用在方法上,value属性,数字越小越先执行
注意
@order注解只在类中生效,在方法中失效
# 获取执行方法对象
在 @Before和@After方法里面,我们使用JoinPoint,在@Around方法里面,我们使用ProceedingJoinPoint
System.out.println("当前执行的方法名:"+joinPoint.getSignature().getName());
System.out.println("当前执行的方法所在类的全包名:"+joinPoint.getSignature().getDeclaringTypeName());
System.out.println("当前的目标对象:"+joinPoint.getTarget());
System.out.println("当前参数对象(是一个数组):"+joinPoint.getArgs());
2
3
4
提示
注解里面的value属性可以省略,直接写值,比如@Before(value = "within(com.moyundong.controller.*Controller)")可以写成 @Before("within(com.moyundong.controller.*Controller)"),@Order(value = 1)可以写成@Order(1)
# 使用方法
- 添加依赖
<!--开启aop所需的依赖 -->
<dependency>
    <groupId>org.springframework.boot</groupId>
    <artifactId>spring-boot-starter-aop</artifactId>
</dependency>
2
3
4
5
- 创建类MyAspect1
- MyAspect1类上添加@Aspect、@Component注解,
- MyAspect1创建3个测试方法,分别对应@Before、@After和@Around
- MyAspect1切入点表达式
value = "within(com.moyundong.controller.*Controller)"表示com.moyundong.controller包下所有以Controller 结尾的类里面的所有方法都受影响。 - 使用JoinPoint或者ProceedingJoinPoint获取了当前执行方法的相关信息。
@Aspect
@Component
@Order(value = 1)
public class MyAspect1 {
    @Before(value = "within(com.moyundong.controller.*Controller)")
    public void afterTest(JoinPoint joinPoint){
        System.out.println("************前置通知MyAspect1*****************");
        System.out.println("当前执行的方法名:"+joinPoint.getSignature().getName());
        System.out.println("当前执行的方法所在类的全包名:"+joinPoint.getSignature().getDeclaringTypeName());
        System.out.println("当前的目标对象:"+joinPoint.getTarget());
        System.out.println("当前参数对象(是一个数组):"+joinPoint.getArgs());
    }

    @After(value = "within(com.moyundong.controller.*Controller)")
    public void beforTest(JoinPoint joinPoint){
        System.out.println("************后置通知MyAspect1*****************");
        System.out.println("当前执行的方法名:"+joinPoint.getSignature().getName());
        System.out.println("当前执行的方法所在类的全包名:"+joinPoint.getSignature().getDeclaringTypeName());
        System.out.println("当前的目标对象:"+joinPoint.getTarget());
        System.out.println("当前参数对象(是一个数组):"+joinPoint.getArgs());
    }

    @Around(value = "within(com.moyundong.controller.*Controller)")
    public Object arountTest(ProceedingJoinPoint proceedingJoinPoint) {
        System.out.println("*****************在目标方法执行前,进入环绕通知MyAspect1***************************");
        System.out.println("当前执行的方法名:"+proceedingJoinPoint.getSignature().getName());
        System.out.println("当前执行的方法所在类的全包名:"+proceedingJoinPoint.getSignature().getDeclaringTypeName());
        System.out.println("当前的目标对象:"+proceedingJoinPoint.getTarget());
        System.out.println("当前参数对象(是一个数组):"+proceedingJoinPoint.getArgs());
        try{
            //执行目标方法,并且得到返回值
            Object object = proceedingJoinPoint.proceed();
            System.out.println("*****************在目标方法执行后,再进入环绕通知MyAspect1***************************");
            //返回目标方法执行后的值
            return object;
        } catch (Throwable e){
            System.out.println("*****************在目标方法执行出现异常时处理***************************");
            return null;
        }
    }
}
2
3
4
5
6
7
8
9
10
11
12
13
14
15
16
17
18
19
20
21
22
23
24
25
26
27
28
29
30
31
32
33
34
35
36
37
38
39
40
41
# 测试
启动项目,在浏览器输入http://localhost:8088/moyundong/Test/hello来看看效果。
提示
大家可以再创建个MyAspect2,内容和MyAspect1差不多,@Order值为2,重新运行程序看看效果。把MyAspect1和MyAspect2的order顺序调换下,再执行下看看效果。
# springboot自定义拦截器
# 拦截器介绍
特点
- 请求都会经过拦截器,响应回来还要经过拦截器
- 拦截器只能拦截控制器(controller),不能拦截jsp
- 拦截器可以中断用户请求
作用
将控制器(controller)中公有的方法都放到拦截器中执行,使用了[AOP思想](#springboot面向切面编程)。# 基本示例
- 创建MyInterceptor1类继承拦截器HandlerInterceptor,MyInterceptor1类就是拦截器。
@Component
public class MyInterceptor1 implements HandlerInterceptor {
    //这个方法是在访问控制器(controller)之前执行的
    @Override
    public boolean preHandle(HttpServletRequest request, HttpServletResponse response, Object handler) throws Exception {
        System.out.println("*********1、这个方法在控制器之前执行******************");
        return true;
    }

    @Override
    public void postHandle(HttpServletRequest request, HttpServletResponse response, Object handler, ModelAndView modelAndView) throws Exception {
        System.out.println("*********3、这个方法在控制器之后执行******************");
    }

    @Override
    public void afterCompletion(HttpServletRequest request, HttpServletResponse response, Object handler, Exception ex) throws Exception {
        System.out.println("*********4、这个方法最后执行******************");
    }
}
2
3
4
5
6
7
8
9
10
11
12
13
14
15
16
17
18
19
- 创建一个InterceptorConfig类,实现WebMvcConfigurer类。通过该类将MyInterceptor1注册到InterceptorConfig类中。
@Configuration
public class InterceptorConfig implements WebMvcConfigurer {
    @Autowired
    private MyInterceptor1 myInterceptor1;

    // 这个方法用来注册拦截器,我们自己写好的拦截器需要通过这里添加注册才能生效
    @Override
    public void addInterceptors(InterceptorRegistry registry) {
        //addInterceptor 注册拦截器
        //addPathPatterns 表示拦截的控制器
        //excludePathPatterns表示排除的控制器
        registry.addInterceptor(myInterceptor1).addPathPatterns("/test/*").excludePathPatterns("/test/test1");
    }
}
2
3
4
5
6
7
8
9
10
11
12
13
14
启动项目:
- 浏览器输入
http://localhost:8088/moyundong/test/test2的时候会调用拦截器信息。 - 浏览器输入
http://localhost:8088/moyundong/test/test1的时候不会调用拦截器
注意
- MyInterceptor1拦截器里面做什么就要根据具体业务了,比如验证是否登录,是否有权限等等。
- springboot2.x以后使用WebMvcConfigurer,在之前使用WebMvcConfigurerAdapter ,配置类要继承WebMvcConfigurerAdapter ,其它用法类似。
# 静态资源访问
在定义拦截器之后,是不能访问我们在resources的目录下创建statics文件夹。在InterceptorConfig配置类中添加如下代码就可以访问了 。
// 这个方法是用来配置静态资源的,比如html,js,css,等等,解决静态资源访问问题。
@Override
public void addResourceHandlers(ResourceHandlerRegistry registry) {
    //addResourceHandler表示为前台访问的路径
    //addResourceLocations表示为files相对应的本地路径
    //我们在resources的目录下创建statics文件夹,里面放了一些静态文件,正常情况不能正常访问,添加如下代码就可以访问了。
    registry.addResourceHandler("/**").addResourceLocations("classpath:/statics/");
}
2
3
4
5
6
7
8
在创建静态资源后,大家先不要加addResourceHandlers方法,访问http://localhost:8088/moyundong/index.html或者 http://localhost:8088/moyundong/a.js是不能访问静态资源的。作为对比加上面的代码重启项目就可以访问静态资源 。
# springboot自定义过滤器
# 过滤器介绍
Filter也称之为过滤器,过滤器是对数据进行过滤,预处理。开发人员可以对客户端提交的数据进行过滤处理,比如敏感词,也可以对服务端返回的数据进行处理。还有就是可以验证用户的登录情况,权限验证,对静态资源进行访问控制,没有登录或者是没有权限时是不能让用户直接访问这些资源的。类似的过滤器还有很多的功能,比如说编码,压缩服务端给客户端返回的各种数据,等等。
# 过滤器配置的方法
# 注解配置
- 首先定义MyFilter类 实现Filter接口。
- 重写里面的三个方法。
@Order(1)
@WebFilter(filterName = "myFilter1",urlPatterns = {"/*"})
public class MyFilter implements Filter {
    @Override
    public void init(FilterConfig filterConfig) throws ServletException {
        System.out.println("初始化过滤器");
    }

    @Override
    public void doFilter(ServletRequest servletRequest, ServletResponse servletResponse, FilterChain filterChain) throws IOException, ServletException {
        System.out.println("进入目标资源之前先干点啥");
        filterChain.doFilter(servletRequest, servletResponse);
        System.out.println("处理一下服务端返回的response");
    }

    @Override
    public void destroy() {
        System.out.println("过滤器被销毁了");
    }
}
2
3
4
5
6
7
8
9
10
11
12
13
14
15
16
17
18
19
20
提示
- @WebFilter注解,filterName属性表示filter的名称,urlPatter表示要拦截的URL资源,可以是一个或者多个。
- **@Order(1)**表示如果有多个拦截器的话就是设置这个拦截器的运行等级,数字越小,越先执行
- **init()**方法只会执行一次,初始化过滤器。
- **doFilter()**核心方法,配置过滤器的逻辑代码。
- **destroy()**只会在项目停止或者是项目重新部署的时候才会执行。
我们可以通过自己定义一个java配置文件,将自定义的Filter 注册到到FilterRegistrationBean里面。
@Configuration
public class FilterConfig {
    @Bean
    public FilterRegistrationBean registFilter(){
        FilterRegistrationBean registrationBean = new FilterRegistrationBean();
        registrationBean.setFilter(new MyFilter());
        registrationBean.addUrlPatterns("/*");
        registrationBean.setName("Filter1");
        registrationBean.setOrder(1);
        return registrationBean;
    }
}
2
3
4
5
6
7
8
9
10
11
12
# 测试
controller代码编写
@RestController
@RequestMapping("/Filter")
public class FilterController {
    @RequestMapping("/testFilter")
    public String testFilter(){
        System.out.println("filter执行成功");
        return "filter";
    }
}
2
3
4
5
6
7
8
9
项目完成之后启动项目,访问接口:localhost:8098/Filter/testFilter,观察控制台运行结果。
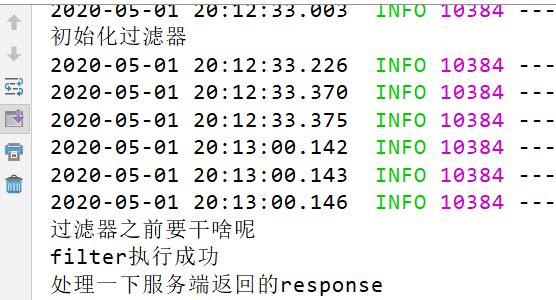
# springboot打成war包发布
本章主要讲解打包spingboot对项目的流程:
提示
本节需要一个完整的项目作为依托,如若没有完整的项目请先阅读springboot集成mybatis
- 确认pom文件打包方式是war包
war - 去掉springboot内嵌tomcat,有两种方法可以去掉
- 使用``标签在
spring-boot-starter-web中去除
<dependency>
  <groupId>org.springframework.boot</groupId>
    <artifactId>spring-boot-starter-web</artifactId>
    <!-- 移除嵌入式tomcat插件 -->
    <exclusions>
      <exclusion>
        <groupId>org.springframework.boot</groupId>
        <artifactId>spring-boot-starter-tomcat</artifactId>
      </exclusion>
    </exclusions>
</dependency>
2
3
4
5
6
7
8
9
10
11
- 或者单独引入spring-boot-starter-tomcat并且把scope设置为provided
<dependency>
  <groupId>org.springframework.boot</groupId>
  <artifactId>spring-boot-starter-tomcat</artifactId>
  <scope>provided</scope>
</dependency>
2
3
4
5
提示
springboot自带tomcat,因此在开发项目时,不需进行tomcat的配置。
- 修改main方法,加上下面代码就可以
@Override
protected SpringApplicationBuilder configure(SpringApplicationBuilder builder) {
    return builder.sources(Test013Application.class);
}
2
3
4
- 运行maven下的package进行打包,打好的war包在target目录下
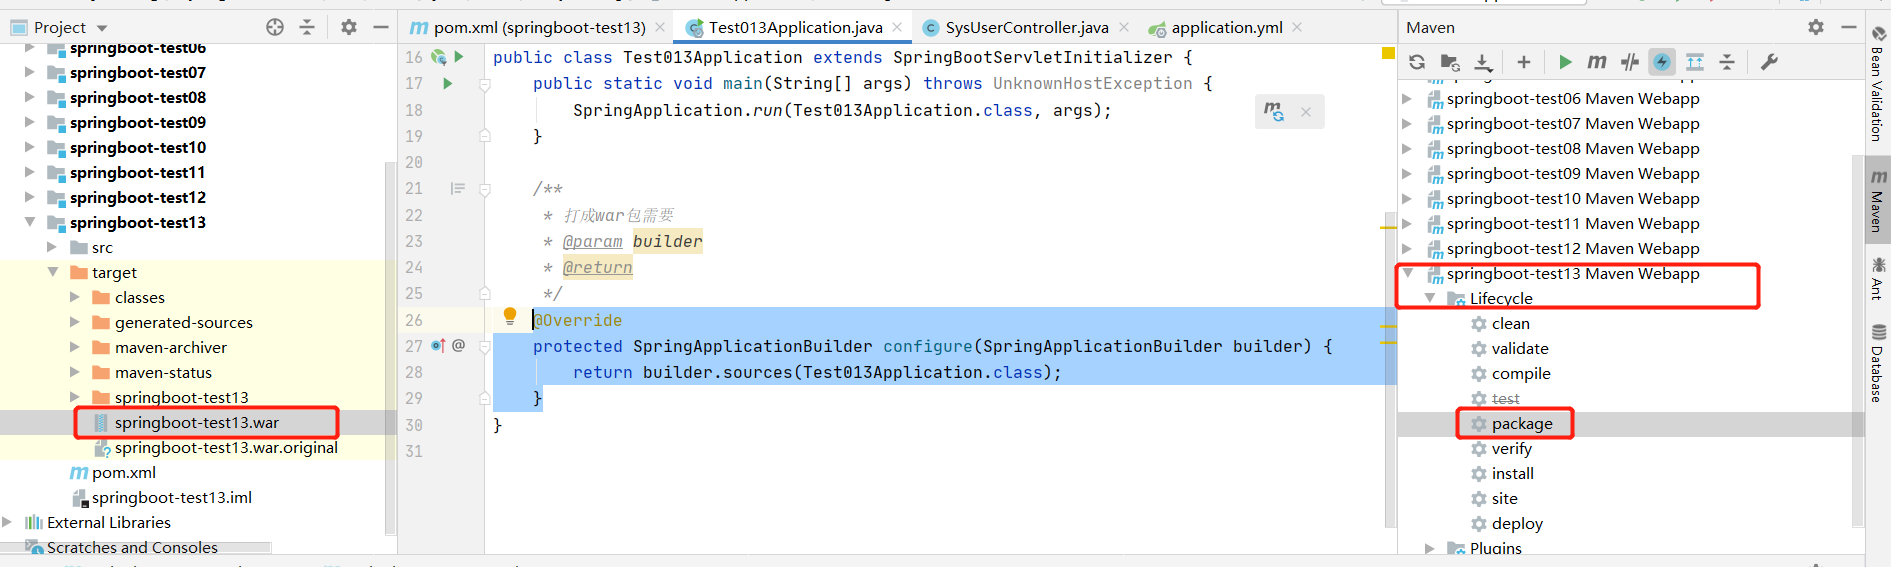
- 把将war包放到tomcat的webapp,启动tomcat
- 在浏览器运行
http://localhost:8080/springboot-test13/sysUser/findAll就可以查询到数据
注意
在外部Tomcat进行部署,访问的时候,application.yml中配置的server.port和server.servlet.context-path是无效的,请使用tomcat的端口,以及webapps下项目名进行访问。
- 有些资料里面讲的还需要添加
spring-boot-maven-plugin插件,但是经过测试,不用添加插件也是可以成功的。如果你没有成功,安装插件再试试。
<plugins>
      <plugin>
        <groupId>org.springframework.boot</groupId>
        <artifactId>spring-boot-maven-plugin</artifactId>
      </plugin>
    </plugins>
2
3
4
5
6
# springboot打成jar包发布
打包方式改成jar
jarwar 在build标签下添加如下插件
<plugins>
    <plugin>
        <groupId>org.springframework.boot</groupId>
        <artifactId>spring-boot-maven-plugin</artifactId>
    </plugin>
</plugins>
2
3
4
5
6
- 运行maven下的package进行打包,此时的jar包就在target目录下打包
- 把生成好的jar包随便拷贝到一个文件夹,本例是springboot-test14.jar
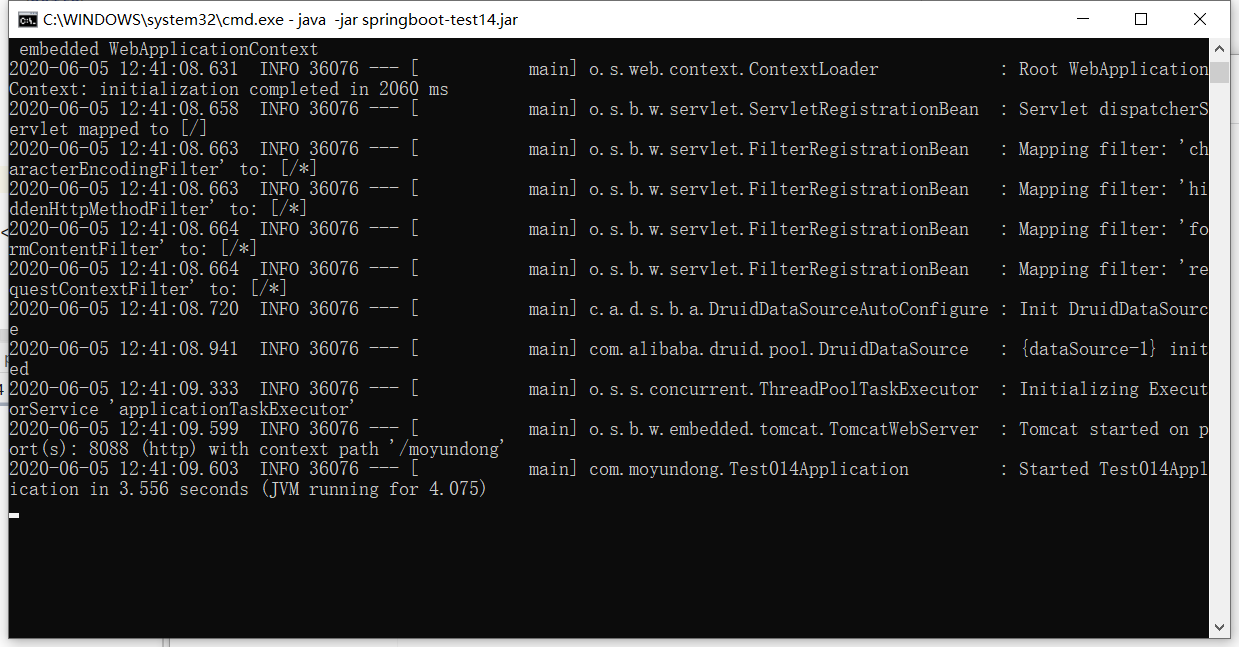
- 在cmd命令里面运行
java -jar springboot-test14.jar,服务就启动成功了 ::: tip提示 如果不加第二步的插件,打包也会成功,但是运行jar包的时候会报springboot-test14.jar中没有主清单属性的错误。 ::: - 在浏览器运行
http://localhost:8088/moyundong/sysUser/findAll就可以查询到数据